About 12 years ago, I started work on a system that was significantly different from the typical desktop/server systems I'd worked on previously. It was an embedded quad-core MIPS-based platform developed for general-purpose in-flight computational processing of radar data. That platform never saw the light of day, but it started me down a path that I'm still on today: building systems from scratch. And when I say systems, I mean the entire software stack from compiler toolchains through distributed end-user applications and into enclosures and production hardware.
That early work led to a project I started in early 2011 called BeagleBox. BeagleBox is a custom build system aimed at the BeagleBoard low-cost TI-based SoC board. The build system focus is on generating a cross-compiler toolchain that is used to compile bootloaders, the Linux kernel and an initial root filesystem. For a variety of non-technical reasons, the project switched in November 2012 to the Raspberry Pi, and the project is now known as PiBox.
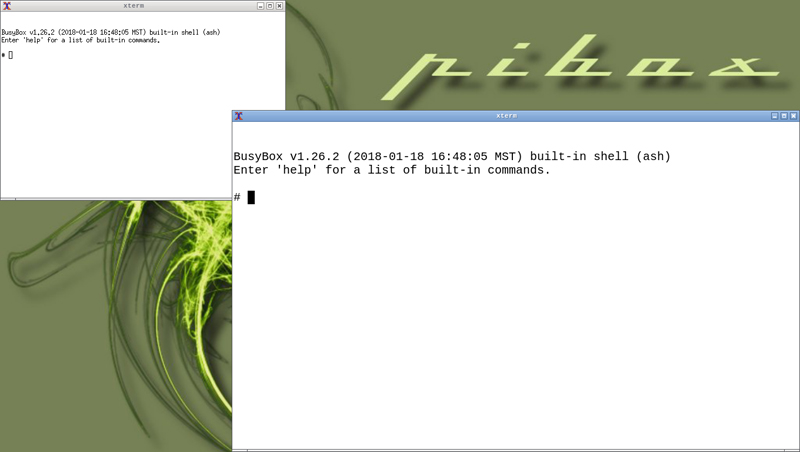
Figure 1. The default UI for the PiBox developement platform is based on Blackbox.
PiBox is a generic name that currently encompasses three platforms. The PiBox Development Platform is the core distribution. It aims to be an easily extendable platform for purpose-driven applications using opkg package management. The development platform boots into a standard X desktop using Blackbox. Beyond the UI and network configuration, there is little functionality. The development platform is just a starting point, but it easily can be extended using the PiBox build environment.
A collection of packages convert the Development Platform into a prototype consumer device called the PiBox Media Server. This device provides a simple UI for navigation to services such as video playback. However, the device also provides services to distributed PiBox Media Players. The Players are software-identical to the Server, but they are used specifically to play remote video sources. Long term, you'll see the Media Server provide a cental hub for home automation via the IronMan project and form the platform for a DIY phone based on the Pi Zero. Components of the the Media Server have been used to create a kiosk picture and video player running on a Pi Touchscreen.
There are three primary goals for PiBox:
Ancillary goals now include learning how to design and produce consumer-grade enclosures, power management and other hardware-related issues, parts supply and costing and production issues.
PiBox met these goals with the current release, and the project continues to evolve by addressing what consumer devices really encompass. This includes support for intergration of mobile devices, voice command and control and distributed sensor networks. If you think of Linux as Linus' answer to freely available UNIX and Minix, then PiBox would be the answer to building distributed IoT infrastructure from the ground up.
The Media Server and Media Player are extensions of the Development Platform. The goal of the Media systems is to provide distributed media playback in a closed network, specifically in my family's travel trailer. We replaced the TV/DVD with the Media Server, plugging in USB sticks filled with videos. The server distributes the videos to mobile devices, such as our Android and iOS tablets, but also to a Media Player. The player holds a Raspberry Pi connected to a pico projector, all enclosed in a box with audio port exposed. We plug in an audio splitter to headphones, point the player at the side of our trailer and watch movies at night while camping.

Figure 2. The Media Server and Media Player have specific hardware specifications.
The server, at the time of this writing, has limited support for Bluetooth devices, but it will eventually support an array of Bluetooth and BLE (Bluetouth low energy) devices for monitoring sensors. There are many other long term goals for the server, including voice control, remote management and better support for a wider array of video formats.
The Media Player is a self-contained box intended to run on battery power only. A Raspberry Pi is connected via HDMI to a handheld projector, a power switch and a battery. The Media Server contains a Pi connected to a 7-port UUGear USB hub, each powered through a single power switch connected to an external power supply. The Server exposes both the HDMI and audio ports, but the HDMI defaults to audio over HDMI. The HDMI doesn't have to be connected for the server to function. The server USB ports are extended from the hub to the case to make them easy to access.
The design for both Server and Player specifies a single power-on switch. The current Player prototype requires powering the Pi and the projector separately, since the projector is an off-the-shelf model that would require modification to make it integrate cleanly.
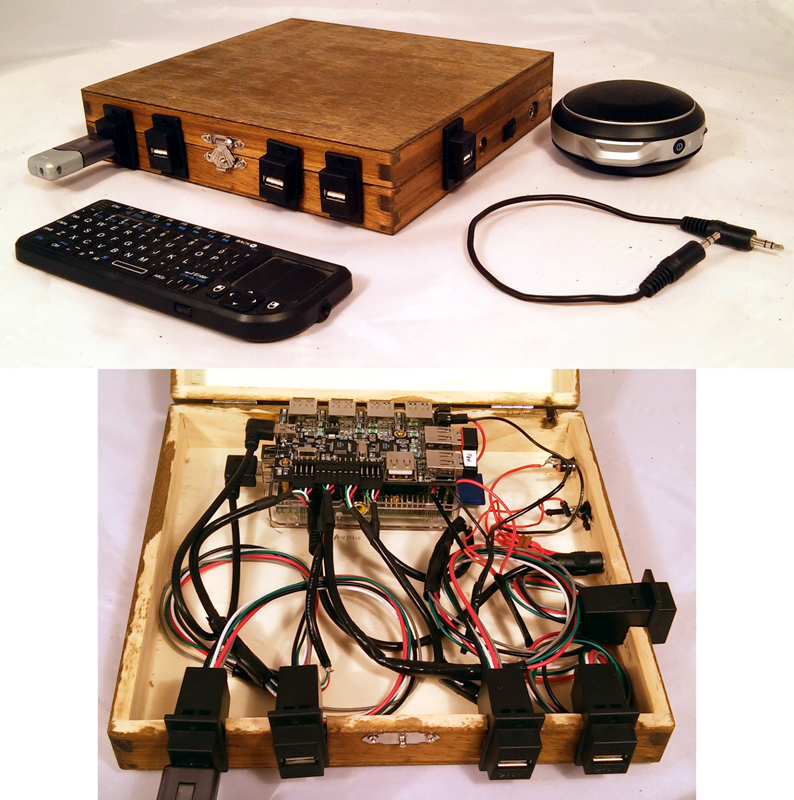
Figure 3. Media Server hardware includes enclosures with exposed USB ports.
At the root of PiBox is the core build system. There are many build systems for embedded systems. Many are based on bitbake, a Python-based metabuild system. Others embrace traditional GNU Make. Metabuilds are simply build systems that wrap other software builds. A metabuild system might include a toolchain, the Linux kernel and various pieces of a root filesystem.
PiBox is a metabuild system that wraps four primary components: a cross toolchain for a chosen hardware platform, a bootloader, the Linux kernel and a root filesystem. The design goal of the metabuild system is to permit easy modification of the primary components, extend the primary components or change them to use different tools and provide a consistent set of targets for building them.
The cross toolchain is built based on Crosstool-NG. For the Raspberry Pi, this includes the use of a custom glibc from Linaro, the ARM division devoted to improving software support for ARM devices. It also includes a custom GCC built with hard float support, allowing applications to take full advantage of the Broadcom processors they support.
PiBox wraps Buildroot and BusyBox to generate a root filesystem. A small number of custom packages are added, including a standalone network configuration tool (PiBox Network Config and its associated libpnc library). The root filesystem is designed to work with both wired Ethernet and WiFi out of the box. The core build system allows for easy rebuilds when changing the Buildroot configuration or testing Buildroot packages.
The design of the build system is flexible enough to support the use of a bootloader, such as Das U-Boot. However, the Raspberry Pi is used with a binary bootloader, also referred to in this case as firmware, provided through a GitHub repository. PiBox downloads and unpacks this firmware during the bootloader phase of the build. However, it easily could be modified to use a bootloader that required compilation.
The top-level Makefile includes files suffixed with .cfg and .mk from the
config directory. The .cfg files provide configuration options
that allow changing upstream repositories and build options without
having to modify build targets in the .mk files. The goal of the .mk
files is to provide a consistent interface, so that all components are
built using the same set of targets: -get, -unpack, -patch, -config, -pkg
and so forth. Most important, all core components of the build offer
-menuconfig targets that allow changing the underlying tool configuration.
All builds are done out of tree to keep build artifacts seperate from
the build system. A -saveconfig target allows saving the changes to any
component into the PiBox source tree. This makes it easier to commit
to a local or upstream repository. A built-in help target explains all
available component targets. Editing and saving a modified Buildroot
configuration looks like this:
make buildroot-menuconfig
make buildroot-saveconfig
make buildroot-clobber
make buildroot
PiBox does more than just build each component. The cross toolchain is relocatable. It can be packaged as an RPM that installs under /opt/rpiTC. The target components (bootloader, kernel and root filesystem) also are packaged along with scripts for formatting and populating an SD card. The SD card is used to boot the Raspberry Pi.
The key advantage to the packaging is that the combination of the toolchain and a staging archive allow cross compiling of applications without having to build the core development platform. A project with multiple developers deploys the cross build environment to developer systems. Developers focus on app development instead of building the core development platform. Template build systems are available for autoconf projects and for downloading and compiling/packaging third-party applications to extend the core root filesystem.
Like many Raspberry Pi distributions, PiBox comes with a set of scripts to ease installation to an SD card. The public releases of the binary distribution includes these scripts and all files needed by end users wanting to try PiBox without compiling anything.
The PiBox Development Platform is a base on which purpose-driven systems
can be built. For the PiBox Media Server and PiBox Media Player, I've
developed a UI based on Matchbox, a stacked window manager running
on X.org over the framebuffer. Apps are managed by a dæmon
(appmgr)
that handles communications between them and a back-end set of dæmons
(piboxd, for example) for system services. A newly developed API layer
(libpibox and libpnc) provides custom interfaces for handling common
tasks, such as network configuration and media sharing.
The Media systems are created from the Development Platform using a collection of opkg-formatted packages. The packages are built from source repositories using a cross-compiler environment that relies on the cross toolchain and staging tree from the Development Platform.
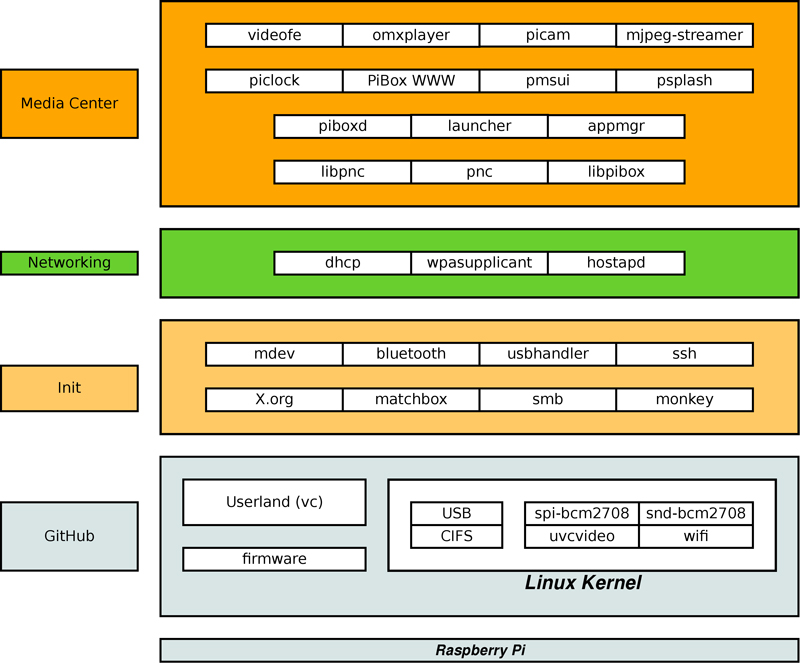
Figure 4. A small but growing set of library APIs was recently added to the software stack.
PiBox applications are written in C using GTK+ 2.x and Cairo. They install a configuration file announcing their presence to the app manager. The app manager chooses which apps to show and in what order, then displays them on the navigation page scaled to fit the display. Current apps include a themed analog clock, video playback, webcam, XMRadio and network configuration, among others.
The Media systems are designed to be used from the primary console. However, additional functionality is available from a web UI, including a webcam stream and complete network configuration. The web UI provides user authentication and via client-side JavaScript mixed with a PHP back end that speaks a custom network-oriented protocol to PiBox dæmons. This UI recently received the initial stubs of a RESTful interface allowing a custom-designed Android keyboard to be used to control the console UI. Android support is still in early development as is a migration to a node.js REST API for IoT control and home automation.
All repositories are developed using cdtools, a simple bash configuration
tool that allows easy context switching between projects while encouraging
a common and consistent structure for all PiBox-related build systems.
The primary purpose of the Media systems is for server-provided video content distributed to players. "Players" includes both mobile devices and the custom PiBox Media Player.
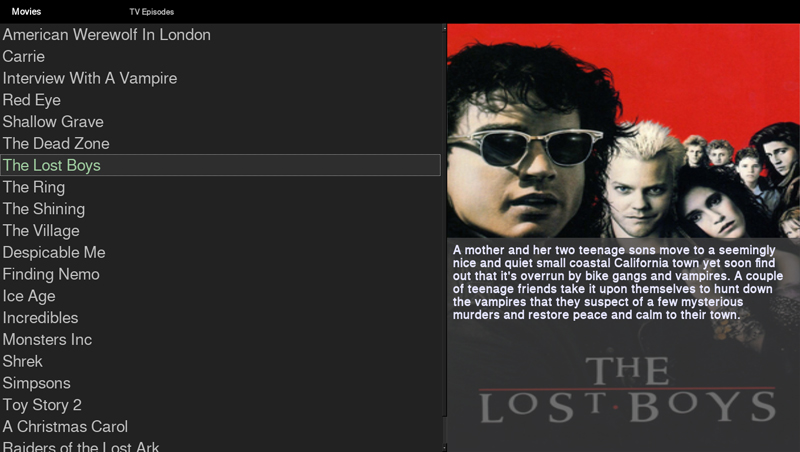
Figure 5. VideoFE's video list, which is a sorted collection from multiple sources, is also searchable.
Media sources are intended to be found on USB Flash media sticks. The Raspberry Pi has its own hardware-accelerated media player, omxplayer. PiBox integrated this as a back-end player to a custom front-end UI component known simply as VideoFE. VideoFE is configurable to use other players, and it's been used on development desktops running xine.
VideoFE presents a list of videos and displays the poster of the current selection. Video data comes from The Movie DB via its JASON API. The data is retrieved using a custom Java application called VideoLib. The application runs on a desktop. It scans a directory tree and does a lookup by filename. The lookup can be customized if the filename isn't a good match, and The Movie DB provides alternative options that also can be selected. Once the directory tree is scanned correctly, the database is saved to the top of the tree, which should be the top of the media stick.
The UI has a customizable keymap file that provides a consistent interface for all apps. By default, the Esc key exits an application and returns the user to the navigation page. The arrow keys move around the navigation page. The design is intended to require as few keys as possible. The actual implementation of the Media systems makes use of a very small FAVI keyboard that is ideal for a variety of PiBox use cases.
As a learning tool, PiBox opened my eyes to a wide variety of problems. The first was the problem of switching hardware platforms easily. Crosstool-NG makes this easy, but wrapping this inside the PiBox build system made it easy to experiment quickly with different configurations. This allowed me to switch originally from the BeagleBone to the Raspberry Pi and recently aided in a quick migration to supporting the Raspberry Pi 2, which has a slightly different processor configuration. Early versions of PiBox toolchains also have been used for PowerPC and Intel targets.
During early development, I had to deal with device handling during boot. To reduce overhead and speed boot times, many embedded systems use mdev instead of udev for device handling. Decoding mdev events took some work and led to custom scripting to deal with USB device hot plug events, which were critical to the Media systems.
A related issue invovled removing early boot messages while speeding boot times. Boot times are still on the order of a minute or more (mostly due to network setup), but boot messages now are handled by the use of pslplash to show boot processing. I also had to start X.org very early without starting any clients. This is due to timing issues that prevent keyboards from operating properly. X is later stopped and restarted. This circumvents the non-functional keyboard issues without the user noticing the workaround.
PiBox offers both a console UI-based on GTK+/Cairo and a JavaScript-based interface based on the Monkey web server and a PHP back end. I originally looked at building an HTML5 interface (and would still like to in the long run), but WebKit wouldn't compile properly, and I didn't want to waste too much time trying to address that issue. So I fell back to what I already knew how to do: build a GTK+-based UI.
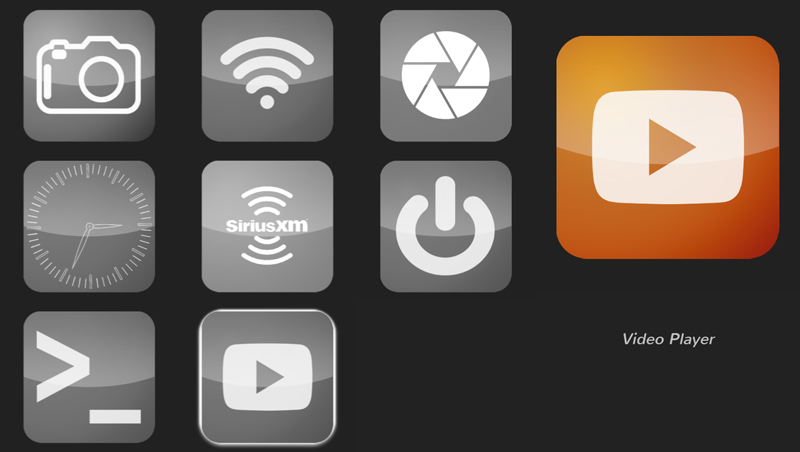
Figure 6. The console UI is consumer-oriented, with few keystrokes required for navigation.
Cairo presented an estoric problem that proved difficult to isolate. Cairo is used by GTK+ to paint icons in the navigation page. This code originally was tested on my Intel-based desktop and worked fine. On the target board, the icons failed to be displayed. After much trial and error, I discovered that Cairo was unhappy within non-square images on the ARM board. Making them square fixed the problem. This adds an odd requirement for app developers when creating the navigation icons for their apps.
The web UI required me to learn more about JavaScript, a language I enjoy more now that I understand it a better. Its interaction with back-end PHP is clean and easy to understand, but creating UIs can require carrying client libraries around from application to application, much like Java. It does offer the option of setting up direct connections from the client browser to non-web-based back ends, and that's something I find very encouraging.
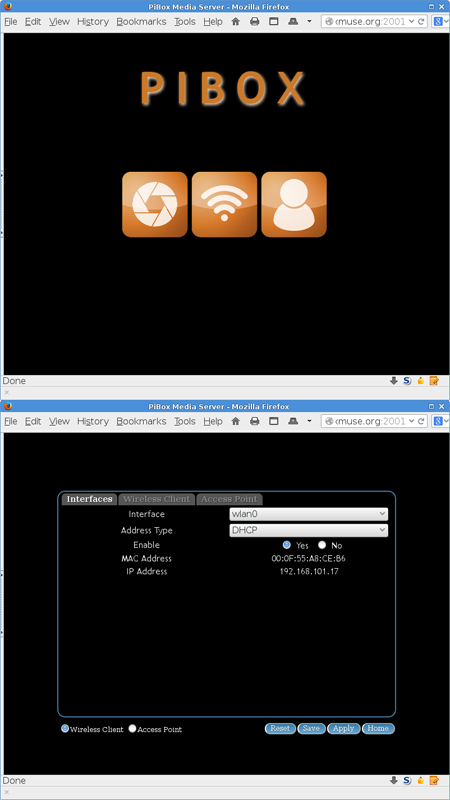
Figure 7. The WebUI supports user authentication and provides access to the webcam.
What I found less encouraging was the use of web-based media through proxies. The only format that moves natively through http/https is motion jpeg (mjpeg), and on the Pi, this works only at a relatively low frame rate. Note that this is a USB webcam, not the onboard camera. I chose to use a webcam due to the relatively short ribbon cables provided for the onboard camera. The use case for the webcam is as a backup camera for our trailer. The idea is to allow the camera to be physically distant from the Pi.

Figure 8. The webcam image can be flipped so the camera can be mounted from above or below a window.
PiBox Media systems are designed to reduce user-managed wires. This includes networking, where WiFi rules. Unfortunately, not all WiFi dongles are created equal with all versions of the Linux kernel. After many months of trial and error, I managed to find that the Ralink RT5370 chip provided the most stable experience. However, support was left in place for the variety of chips I tested. Handling USB WiFi dongles is done manually, outside of mdev, with the help of USB device IDs and a custom init script.
While researching WiFi dongles, I also improved the network configuration
utility I wrote from scratch. This GTK+ application provides support
for configuring WiFi or wired static and DHCP connections and also
allows configuring the Media Server as a wireless access point for the
closed network in our travel trailer. This utility is available in the
Development Platform, but with GTK+ themes, inherits the look of the custom
UI for the Media systems. The utility comes with a WiFi scanner and also
provides the libpiboxnet library. The library is used by
piboxd, a dæmon
that handles many functions including inbound requests from the web UI.
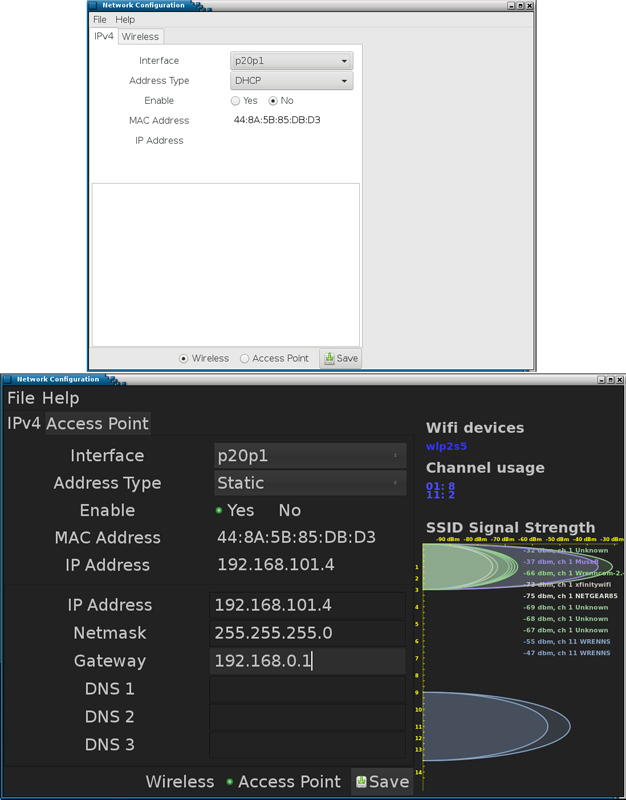
Figure 9. pibox-network-config is available in the development platform (above) but takes on a different appearance in the Media systems (below).
There are many other issues I covered over the years of PiBox development,
including learning enough Blender to generate a 3D design for a sample
enclosure—an experiment still in need of much refinement. But the
design of the build system for the Development Platform has proven flexible
enough for a variety of platforms. Cross-compilation turns out to be
much simpler than I expected once you get a method identified. I use
a common cross.sh script in many of the packages I build to simplify
this process. I also found that the use of cdtools made it possible
to create an all-encompassing metabuild that automates the download and
build process for all packages at release time.
Future development plans include integration with remote sensors. I hope to create my own Iron Man home, with voice commands handled by my Jarvis project. Jarvis is a proof-of-concept voice-to-text-to-action-to-speech Java project. But the hope is to have it integrate with a back-end sensor management system, connected through a PiBox Media Server, to handle control of devices around the home.
This entire project has been a one-man job, and I'm very much interested in others joining in, even if all they do is fork the project. I'd like to hear how I can improve the build systems, the Media systems and their UIs and apps. I've created as much documentation as I can on the wiki, and interested developers can follow progress on my Redmine issue tracker. All code is released as open source and is available from GitLab.com.