
In an article in the June 2018 issue of LJ, I introduced a basic recipe for building your own minimal Linux-based distribution from source code packages. The guide started with the compilation of a cross-compiler toolchain that ran on your host system. Using that cross-compiler, I explained how to build a generic x86-64 target image, and the Linux Journal Operating System (LJOS) was born.
This guide builds on what you learned from Part I, so if you haven't already, be sure to go through those original steps up to the point where you are about to package the target image for distribution.
Here's a quick review the terminology from the first part of this series:
To follow along, you'll need the following:
Note: I ended up rebuilding this distribution with the 4.19.1 Linux kernel. If you want to do the same, be sure to install the development package of the OpenSSL libraries on your host machine or else the build will fail. On distributions like Debian or Ubuntu, this package is named libssl-dev.
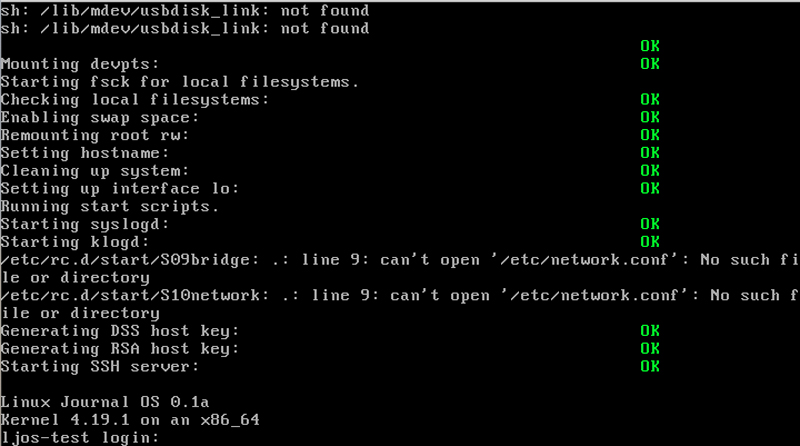
After following along with Part I, you will have noticed that during boot time, a couple errors are generated (Figure 1).

Figure 1. Errors generated during the init process of a system boot.
Let's clear out some of those errors. The
first one relates to a script not included in BusyBox:
usbdisk_link. For the purpose of this exercise (and because
it isn't important for this example), remove the references to
both usbdisk_link and ide_link in the
${LJOS}/etc/mdev.conf file. Refer to the following
diff output to see what I mean (focus
closely on the lines that begin with both sd and
hd):
--- mdev.conf.orig	2018-11-10 18:10:14.561278714 +0000
+++ mdev.conf	2018-11-10 18:11:07.277759662 +0000
@@ -26,8 +26,8 @@ ptmx    root:tty 0666
 # ram.*
 ram([0-9]*)     root:disk 0660 >rd/%1
 loop([0-9]+)    root:disk 0660 >loop/%1
-sd[a-z].*       root:disk 0660 */lib/mdev/usbdisk_link
-hd[a-z][0-9]*   root:disk 0660 */lib/mdev/ide_links
+sd[a-z].*       root:disk 0660
+hd[a-z][0-9]*   root:disk 0660

 tty             root:tty 0666
 tty[0-9]        root:root 0600
Now, let's address the networking-related errors. Create the ${LJOS}/etc/network/interfaces file:
$ cat > ${LJOS}/etc/network/interfaces << "EOF"
> auto eth0
> iface eth0 inet dhcp
> EOF
Now create the ${LJOS}/etc/network.conf file with the following contents:
# /etc/network.conf
# Global Networking Configuration
# interface configuration is in /etc/network.d/

INTERFACE="eth0"

# set to yes to enable networking
NETWORKING=yes

# set to yes to set default route to gateway
USE_GATEWAY=no

# set to gateway IP address
GATEWAY=10.0.2.2
Finally, create the udhcpc script. udhcpc is a small DHCP client
primarily written for minimal or embedded Linux systems. It was (or should
have been) built with your BusyBox installation if you followed the steps
in Part I
of this series. Create the following directories:
$ mkdir -pv ${LJOS}/etc/network/if-{post-{up,down},
↪pre-{up,down},up,down}.d
$ mkdir -pv ${LJOS}/usr/share/udhcpc
Now, create the ${LJOS}/usr/share/udhcpc/default.script file with the following contents:
#!/bin/sh
# udhcpc Interface Configuration
# Based on http://lists.debian.org/debian-boot/2002/11/
↪msg00500.html
# udhcpc script edited by Tim Riker <Tim@Rikers.org>

[ -z "$1" ] && echo "Error: should be called from udhcpc"
 ↪&& exit 1

RESOLV_CONF="/etc/resolv.conf"
[ -n "$broadcast" ] && BROADCAST="broadcast $broadcast"
[ -n "$subnet" ] && NETMASK="netmask $subnet"

case "$1" in
    deconfig)
            /sbin/ifconfig $interface 0.0.0.0
            ;;

    renew|bound)
            /sbin/ifconfig $interface $ip $BROADCAST $NETMASK

            if [ -n "$router" ] ; then
                    while route del default gw 0.0.0.0 dev
                     ↪$interface ; do
                            true
                    done

                    for i in $router ; do
                            route add default gw $i dev
                             ↪$interface
                    done
            fi

            echo -n > $RESOLV_CONF
            [ -n "$domain" ] && echo search $domain >>
             ↪$RESOLV_CONF
            for i in $dns ; do
                    echo nameserver $i >> $RESOLV_CONF
            done
            ;;
esac

exit 0
Change the file's permission to enable the execution bit for all users:
$ chmod +x ${LJOS}/usr/share/udhcpc/default.script
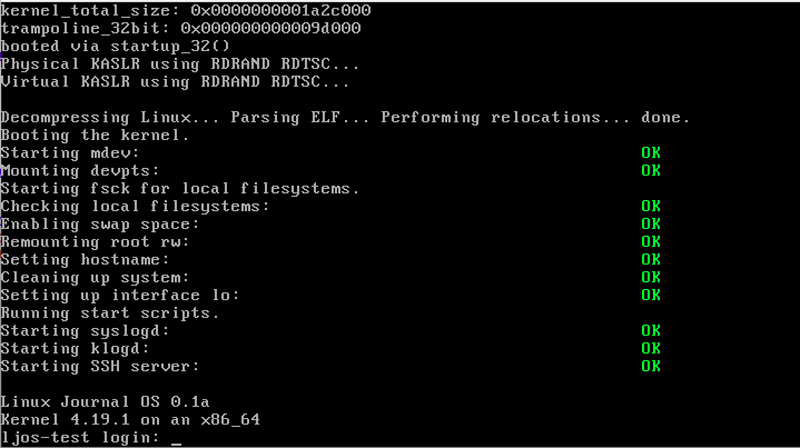
The next time you boot up the target image (after re-preparing it), those boot errors will have disappeared.

Figure 2. A Cleaned-Up System Boot
One last thing I want to address is the root user's
default shell. In my instructions from Part I, I had you set the shell to
ash. For some odd reason, this will give you issues when
attempting to ssh in to the distribution (via Dropbear). To avoid this,
modify the entry in the ${LJOS}/etc/passwd file so that
it reads:
root::0:0:root:/root:/bin/sh
Notice the substitution of ash with
sh. Ultimately, it's the same shell, as sh
is a softlink to ash.
The cross-compilation build directory and the headers from the previous article should not have been deleted. Export the following variables (which you probably can throw into a script file):
set +h
umask 022
export LJOS=~/lj-os
export LC_ALL=POSIX
export PATH=${LJOS}/cross-tools/bin:/bin:/usr/bin
unset CFLAGS
unset CXXFLAGS
export LJOS_HOST=$(echo ${MACHTYPE} | sed "s/-[^-]*/-cross/")
export LJOS_TARGET=x86_64-unknown-linux-gnu
export LJOS_CPU=k8
export LJOS_ARCH=$(echo ${LJOS_TARGET} | sed -e 's/-.*//'
 ↪-e 's/i.86/i386/')
export LJOS_ENDIAN=little
export CC="${LJOS_TARGET}-gcc"
export CXX="${LJOS_TARGET}-g++"
export CPP="${LJOS_TARGET}-gcc -E"
export AR="${LJOS_TARGET}-ar"
export AS="${LJOS_TARGET}-as"
export LD="${LJOS_TARGET}-ld"
export RANLIB="${LJOS_TARGET}-ranlib"
export READELF="${LJOS_TARGET}-readelf"
export STRIP="${LJOS_TARGET}-strip"
Dropbear
Dropbear is a lightweight SSH server and client. It's especially useful in minimal or embedded Linux distributions, and that's why you'll be installing it here. But before doing so, change into the CLFS bootscripts directory (clfs-embedded-bootscripts-1.0-pre5) from the previous part and install the customized init scripts:
$ make DESTDIR=${LJOS}/ install-dropbear
Now that you've installed the init scripts for Dropbear, install the SSH server and client package. Change into the package directory, and run the following configure command:
CC="${CC} -Os" ./configure --prefix=/usr --host=${LJOS_TARGET}
Compile the package:
$ make MULTI=1 PROGRAMS="dropbear dbclient dropbearkey
 ↪dropbearconvert scp"
Install the package:
$ make MULTI=1 PROGRAMS="dropbear dbclient dropbearkey
 ↪dropbearconvert scp" DESTDIR=${LJOS}/ install
Make sure the following directories are created:
$ mkdir -pv ${LJOS}/{etc,usr/sbin}
$ install -dv ${LJOS}/etc/dropbear
And, softlink the following binary:
ln -svf /usr/bin/dropbearmulti ${LJOS}/usr/sbin/dropbear
ln -svf /usr/bin/dropbearmulti ${LJOS}/usr/bin/dbclient
ln -svf /usr/bin/dropbearmulti ${LJOS}/usr/bin/dropbearkey
ln -svf /usr/bin/dropbearmulti ${LJOS}/usr/bin/dropbearconvert
ln -svf /usr/bin/dropbearmulti ${LJOS}/usr/bin/scp
ln -svf /usr/bin/dropbearmulti ${LJOS}/usr/bin/ssh
BusyBox (Revisited)
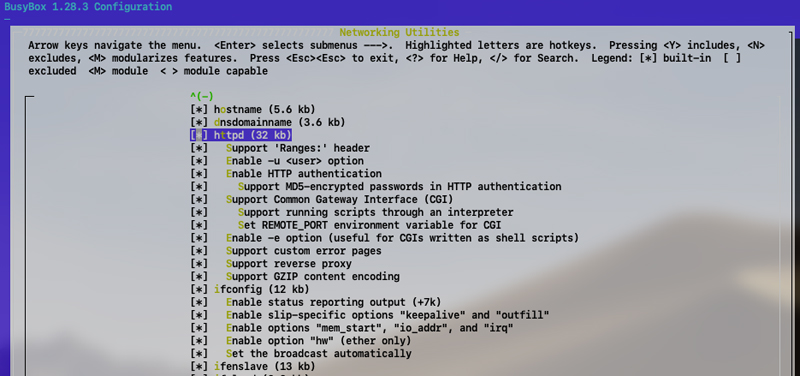
Later in this tutorial, I take a look at the HTTP dæmon
included in the BusyBox package. If you haven't already, customize the
package's config file to make sure that httpd is selected
and built:
$ make CROSS_COMPILE="${LJOS_TARGET}-" menuconfig

Figure 3. The Busybox Configuration Menu
Compile and install the package:
$ make CROSS_COMPILE="${LJOS_TARGET}-"
$ make CROSS_COMPILE="${LJOS_TARGET}-" \
CONFIG_PREFIX="${LJOS}" install
Iana-Etc
The Iana-Etc package provides your distribution with the data for the various network services and protocols as it relates to the files /etc/services and /etc/protocols. The package itself most likely will come with outdated data and IANA (Internet Assigned Numbers Authority), which is why you'll need to apply a patch written by Andrew Bradford to adjust the download location for the data update.
Change into the package directory and apply the patch:
$ patch -Np1 -i ../iana-etc-2.30-update-2.patch
Update the package's data:
$ make get
Convert the raw data and IANA into their proper formats:
$ make STRIP=yes
Install the newly created /etc/services and /etc/protocols files:
make DESTDIR=${LJOS} install
Netplug
The Netplug dæmon detects the insertion and removal of network cables and will react by bringing up or taking down the respective network interface. Similar to the Iana-Etc package, the same Andrew Bradford wrote a patch to address some issues with Netplug.
Change into the package directory and apply the patch:
$ patch -Np1 -i ../netplug-1.2.9.2-fixes-1.patch
Compile and install the package:
$ make && make DESTDIR=${LJOS}/ install
Sysstat
This is a simple one, and although you don't necessarily need this package, let's install it anyway, because it provides a nice example of how other packages are to be installed (should you choose to install more on your own). Sysstat provides a collection of monitoring utilities, which include sar, sadf, mpstat, iostat, tapestat, pidstat, cifsiostat and sa tools.
Change into the package directory and configure/compile/install the package:
$ ./configure --prefix=/usr --disable-documentation
$ make
$ make DESTDIR=${LJOS}/ install
You'll need to create a staging area to remove unnecessary files and strip your binaries of any and all debugging symbols, but in order to do so, you'll need to copy your entire target build environment to a new location:
$ cp -rf ${LJOS}/ ${LJOS}-copy
Remove the cross-compiler toolchain and source/header files from the copy:
$ rm -rfv ${LJOS}-copy/cross-tools
$ rm -rfv ${LJOS}-copy/usr/src/*
Generate a list of all static libraries and remove them:
$ FILES="$(ls ${LJOS}-copy/usr/lib64/*.a)"
$ for file in $FILES; do
> rm -f $file
> done
Strip all debugging symbols from every binary:
$ find ${LJOS}-copy/{,usr/}{bin,lib,sbin} -type f -exec
 ↪sudo strip --strip-debug '{}' ';'
$ find ${LJOS}-copy/{,usr/}lib64 -type f -exec sudo
 ↪strip --strip-debug '{}' ';'
Change ownership of every file to root:
$ sudo chown -R root:root ${LJOS}-copy
And change the group and permissions of the following three files:
$ sudo chgrp 13 ${LJOS}-copy/var/run/utmp
 ↪${LJOS}-copy/var/log/lastlog
$ sudo chmod 4755 ${LJOS}-copy/bin/busybox
Create the following character device nodes:
$ sudo mknod -m 0666 ${LJOS}-copy/dev/null c 1 3
$ sudo mknod -m 0600 ${LJOS}-copy/dev/console c 5 1
You'll need to change into the directory of your copy and compress everything into a tarball:
cd ${LJOS}-copy/
sudo tar cfJ ../ljos-build-10Nov2018.tar.xz *
Now that you have your entire distribution archived into a single file, you'll need to move your attention to the disk volume on which it will be installed. For the rest of this tutorial, you'll need a free disk drive, and it will need to enumerate as a traditional block device (in my case, it's /dev/sdd):
$ cat /proc/partitions |grep sdd
   8       48     256000 sdd
That block device needs to be partitioned. A single partition should
suffice, and you can use any one of a number of partition utilities,
including fdisk or parted. Once that partition
is created and detected by the host system, format the partition with
an Ext4 filesystem, mount it to a staging area and change
into that directory:
$ sudo mkfs.ext4 /dev/sdd1
$ sudo mkdir tmp
$ sudo mount /dev/sdd1 tmp/
$ cd tmp/
Uncompress the operating system tarball of the entire target operating system into the root of the staging directory:
$ sudo tar xJf ../ljos-build-10Nov2018.tar.xz
Now run grub-install to install all the necessary modules
and boot records to the volume:
$ sudo grub-install --root-directory=/mnt/tmp/ /dev/sdd
The --root-directory parameter defines the absolute path
of the staging directory, and the last parameter is the block device
without the partition's label.
Once complete, install the HDD to the physical or virtual machine, and power it up (as the primary disk drive). Within one second, you'll be at the operating system's login prompt.
Note: if you're planning to load this into a virtual machine, it'll make your life much easier if the network interface to the VM is bridged to the local Ethernet interface of your host machine.
As was the case with Part I, you never set a root
password. Log in as root, and you'll immediately fall into
a shell without needing to input a password. You can change this behavior
by using BusyBox's passwd command, which should have been
built in to this image. Before proceeding, change your root
password.
To test the SSH dæmon, you'll need to assign an IP address to your
Ethernet port.
If you type ip addr show at the command line,
you'll see that one does not exist for eth0. To address
that, run:
$ udhcpc
The above command will work only if the udhcpc scripts from earlier were
created and saved to the target area of your distribution. If successful,
re-running ip addr show will show an IP address for
eth0. In my case, the address is 192.168.1.90.
On a separate machine, log in to your LJOS distribution via SSH:
$ ssh root@192.168.1.90
The authenticity of host '192.168.1.90 (192.168.1.90)'
 ↪can't be established.
RSA key fingerprint is SHA256:Jp64l+7ECw2Xm5JjTXCNtEvrh
↪YRZiQzgJpBK5ljNfwk.
Are you sure you want to continue connecting (yes/no)? Yes
root@192.168.1.90's password:
~ #
Voilà! You're officially remotely connected.
There is so much more you can do here. Remember earlier, when I requested that you double-check that BusyBox is building its lightweight HTTP dæmon? Let's take a look at that.
Create a home directory for the dæmon:
# mkdir /var/www
And using BusyBox's lightweight vi program, create the
/var/www/index.html file and make sure it contains the following:
<html>
<head><title>This is a test.</title></head>
<body><h1>This is a test.</h1></body>
</html>
Save and exit. Then manually bring up the HTTP dæmon with the argument defining its home directory:
# httpd -h /var/www
Verify that the service is running:
# ps aux|grep http
 1177 root      0:00 httpd -h /var/www
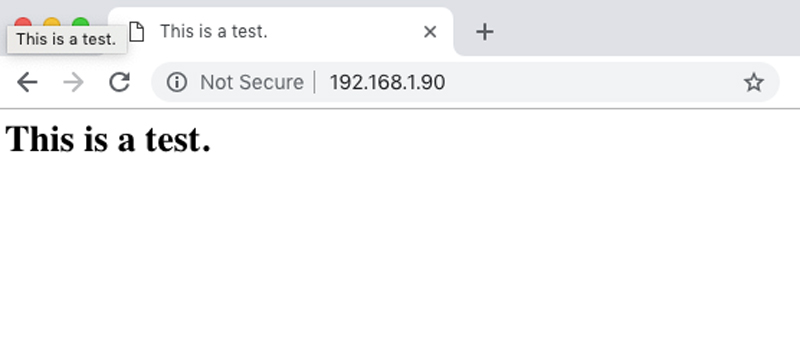
On a separate machine and using your web browser, connect to the IP address of your Linux distribution (the same address you SSH'd to). A crude HTML web page hosted by your distribution will appear.

Figure 4. Accessing the Web Server Hosted from Your Custom Distribution
This article builds on the exercise from my previous article and added more to the minimal and custom Linux distribution. It doesn't need to end here though. Find a purpose for it, and using the examples highlighted here, build more packages into it.
Petros Koutoupis, LJ Editor at Large, is currently a senior platform architect at IBM for its Cloud Object Storage division (formerly Cleversafe). He is also the creator and maintainer of the RapidDisk Project. Petros has worked in the data storage industry for well over a decade and has helped pioneer the many technologies unleashed in the wild today.