

The cloud is here to stay, regardless of how you access data day to day. Whether you are uploading and sharing new photos with friends in your social-media account or updating documents and spreadsheets alongside your peers in your office or school, chances are you're connecting to the cloud in some form or another.
In the first part of this series, I explored what makes up the cloud and how it functions when all of its separate moving pieces come together. In this article, building from Part I's foundations, I cover using the cloud through some actual examples.
For the purposes of this article, I'm focusing on a few of the top offerings provided by Amazon Web Services (AWS). Please know that I hold no affiliation to or with Amazon, nor am I stating that Amazon offerings exceed those of its competitors.
If you haven't already, be sure to register an account. But before you do, understand that charges may apply. Amazon, may offer a free tier of offerings for a limited time, typically a year, to newly registered users. In most cases, the limitations to these offerings are far less than ideal for modern use cases. It is a pay-as-you go model, and you'll be charged only as long as the instance or service continues to be active.
As soon as you are registered and logged in from within your web browser, you'll be greeted by a fairly straightforward dashboard.
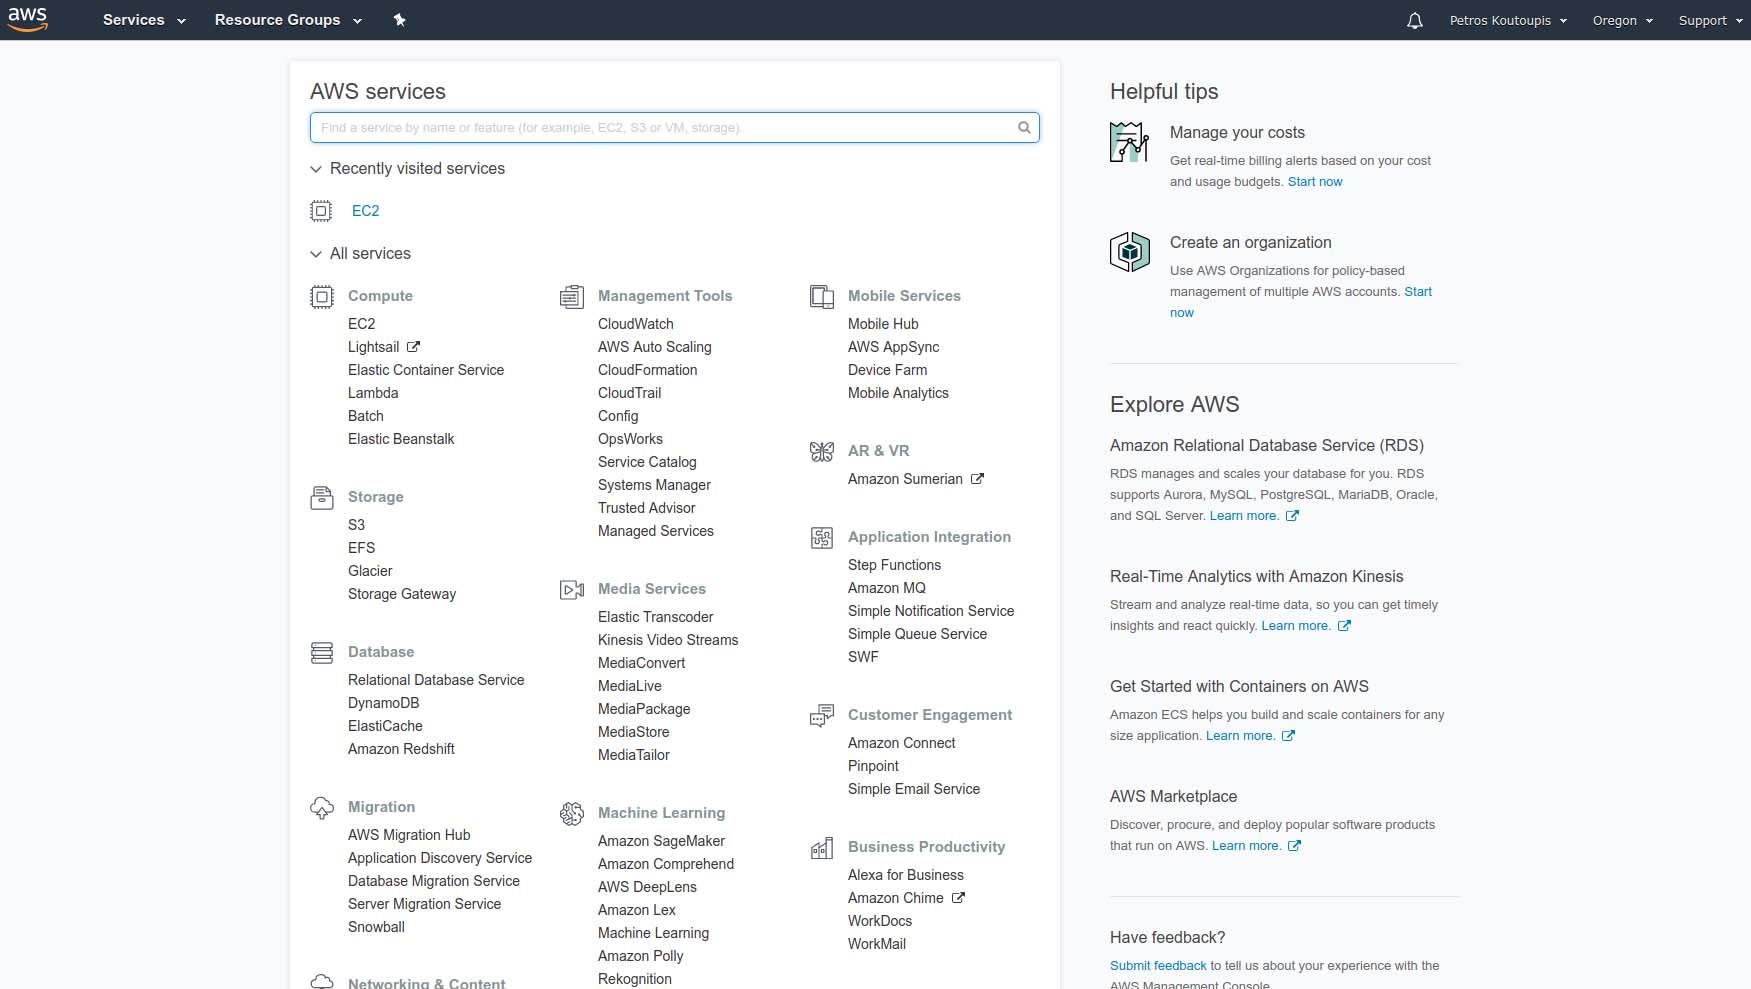
Figure 1. The AWS Main Dashboard of Services and Resources
At first, companies leveraging cloud compute applied a straight copy-and-paste of their very own data centers for deploying standard web/application/database servers. The model was the same. There is nothing wrong with that approach. The transition for most converting from on-premises to the cloud would have been somewhat seamless—at least from the perspective of the user accessing those resources. The only real difference being that it was just in a different data center and without the headache of maintaining the infrastructure supporting it.
In the world of AWS, virtual compute servers are managed under the Elastic Cloud Computing (EC2) stack, from whole virtual instances to containers and more. Let's begin an example EC2 experiment by navigating to the EC2 dashboard.
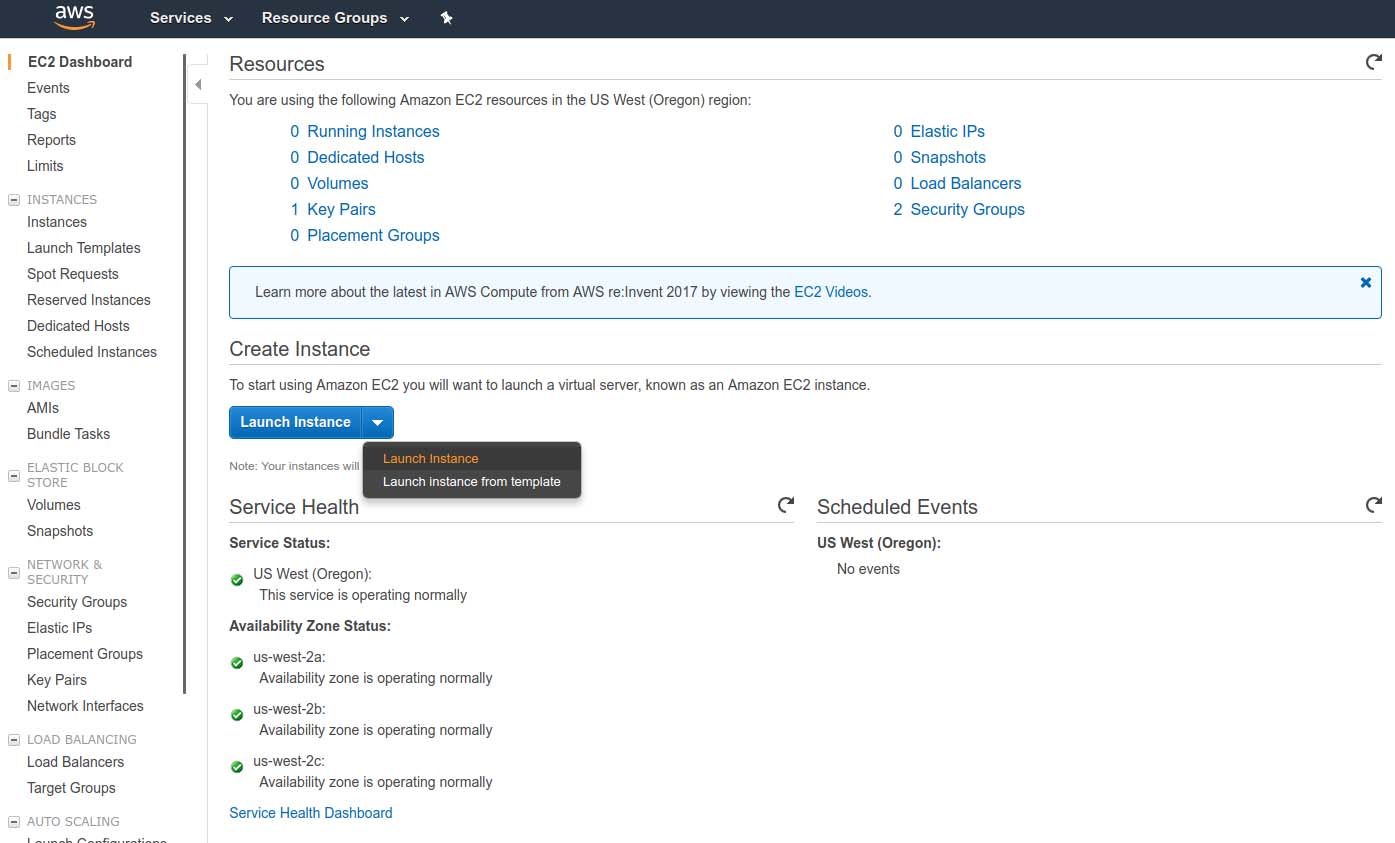
Figure 2. The Elastic Cloud Computing Dashboard
After you select "Launch instance", you'll be presented with a screen where you can select from a preconfigured image of various Linux and Windows installations. For this example, let's choose Ubuntu Server 16.04.
The following screen provides the option of defining the number of virtual cores or processors required, the total amount of memory and the network speed. Remember, the more cores and memory defined in this instance, the more costly.
From this point, you can decide whether to customize this particular instance further with additional local storage (using the Elastic Block Storage or EBS framework), security policies, deployment region (data center) and so on. For this example, let's select "Review and Launch".
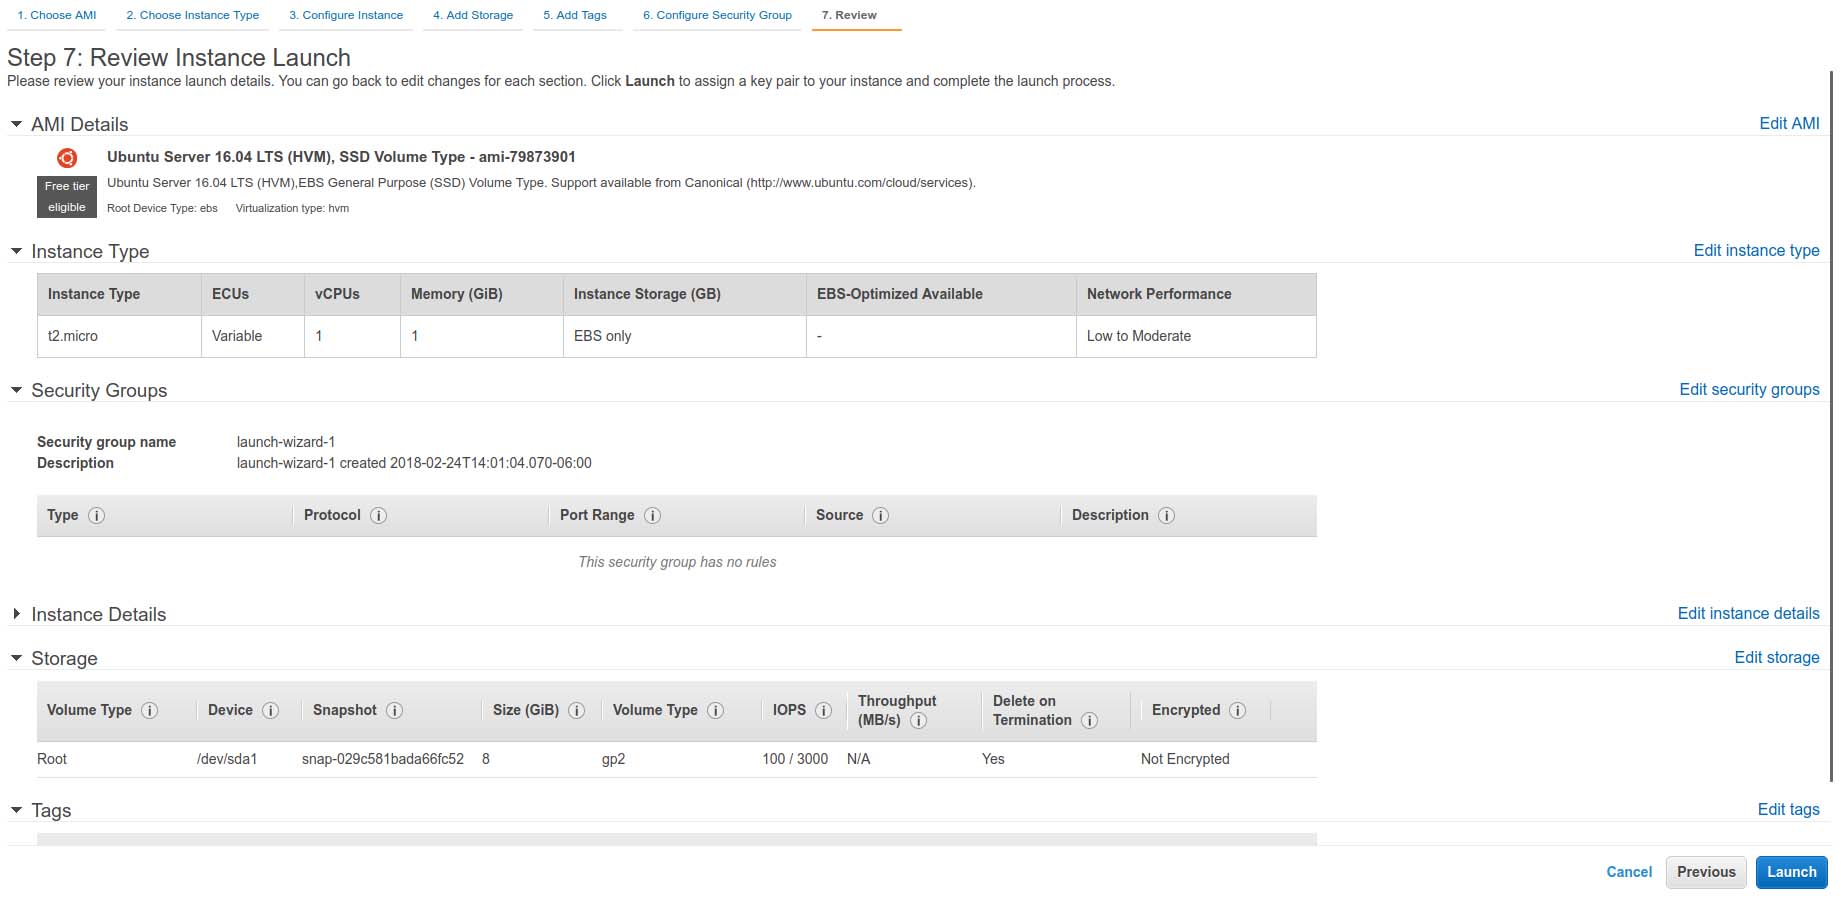
Figure 3. The EC2 Instance Review Screen
Confirm that all your settings are correct, and also note the instance's Security Group name (you'll revisit this shortly). Press Launch.
This next step is very important. You'll be prompted to either associate an existing public/private key pair to access this virtual machine or create a new one. When created, be sure to download and store a copy of the generated PEM file somewhere safe. You will need this later.
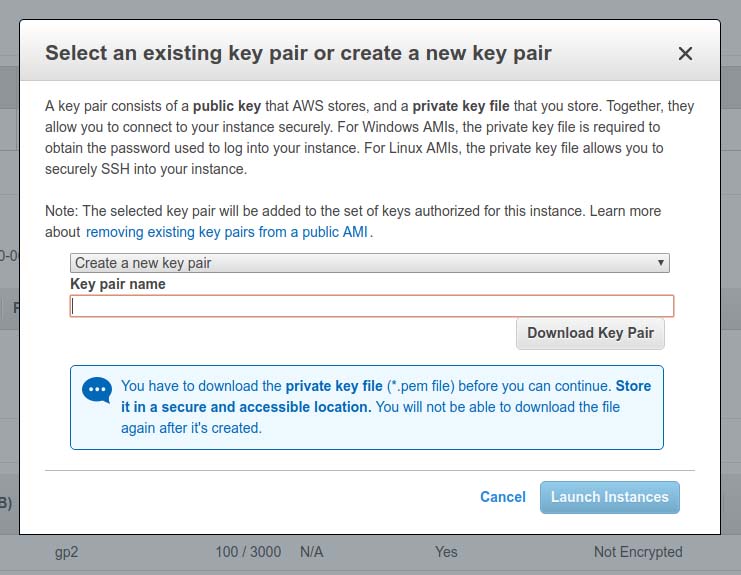
Figure 4.The EC2 Public/Private Key Pair
Launch your instance and go to the Instances Dashboard. Your virtual machine is now up and running, and you should be able to log in to it using that PEM file.
Now, locate that PEM file on your local machine and change its permissions to only read-access for the owner:
$ chmod 400 Linux-Journal.pem
Using SSH and referencing that same PEM file, log in to that instance by its public IP address and as the user ubuntu:
$ ssh -i Linux-Journal.pem ubuntu@35.165.122.94
Welcome to Ubuntu 16.04.3 LTS (GNU/Linux 4.4.0-1049-aws x86_64)

 * Documentation:  https://help.ubuntu.com
 * Management:     https://landscape.canonical.com
 * Support:        https://ubuntu.com/advantage

  Get cloud support with Ubuntu Advantage Cloud Guest:
    http://www.ubuntu.com/business/services/cloud

0 packages can be updated.
0 updates are security updates.

The programs included with the Ubuntu system are free software;
the exact distribution terms for each program are described in
the individual files in /usr/share/doc/*/copyright.

Ubuntu comes with ABSOLUTELY NO WARRANTY, to the extent
permitted by applicable law.

To run a command as administrator (user "root"), use
"sudo <command>". See "man sudo_root" for details.

ubuntu@ip-172-31-21-167:~$
Voilà! You did it. You deployed a virtual machine on AWS and are now connected to it. From this point on, you can treat it like any other server. For instance, now you can install Apache:
$ sudo apt install apache2
Now that Apache is installed and running, you need to modify that same Security Group used by this instance to allow access to port 80 over the same public IP address. To do that, navigate to the instance dashboard menu option "Security Groups" located under the Network and Security category. Find your Security Group in the list, select it, and at the bottom of the selection table, click the Inbound tab. Next, let's add a rule to allow incoming access on port 80 (HTTP). After all is done, open a web browser, and paste in the machine's public IP address.
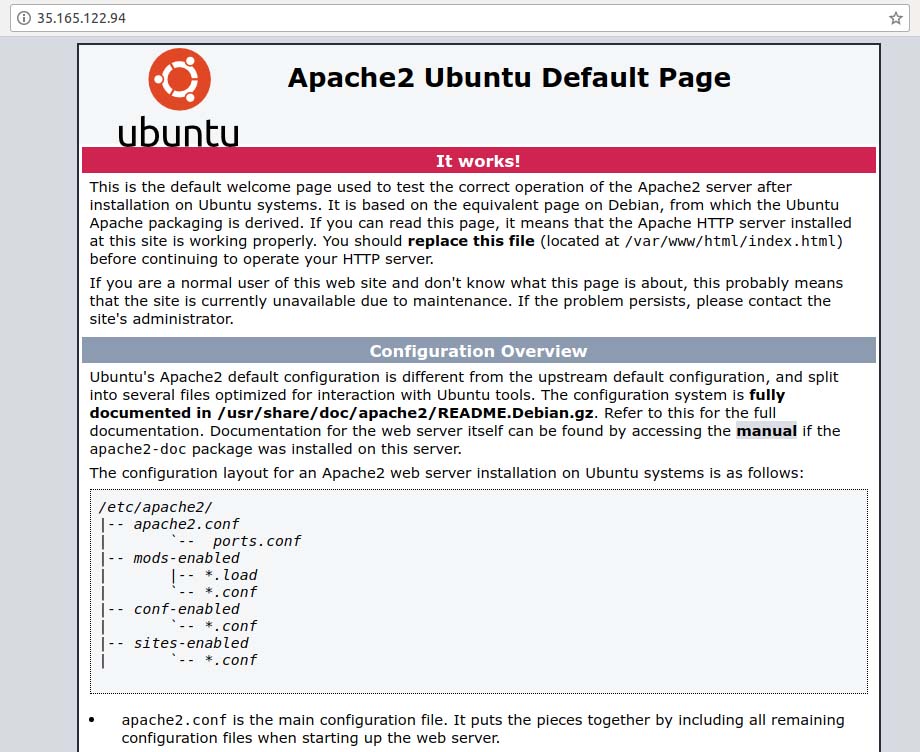
Figure 5. Accessing Port 80 on the Virtual Machine Instance
Now, what if you don't need a full-blown operating system and care about running only one or two applications instead? Taking from the Apache example above, maybe you just need a web server. This is where Elastic Container Service (ECS) comes into the picture. ECS builds on top of EC2 in that you are required to spin up an EC2 instance to host the uploaded Docker instances from your Amazon-hosted Docker image registry. Docker is the most popular of container technologies. It is a userspace and lightweight virtualization platform that utilizes Linux Control Groups (cgroups) and namespaces to manage resource isolation.
As users continue to entrench themselves in the cloud, they'll start to rely on the provider's load balancers, DNS managers and more. The model discussed earlier evolves to accommodate those requirements and simplify its management. There even may be a desire to plug in to the provider's machine learning or analytics platforms and more.
The traditional data center starts to disappear when going serverless. It's a very elastic model—one where services spin up and down, always in response to the demand. Much less time is spent logged in to a server, and instead, DevOps engineers spend most of their time writing API code to connect all the dots in their products. The fact that Linux runs everything underneath is sort of lost in the equation. There is less of a need to know or even care.
As one would expect, container technologies have helped accelerate cloud adoption. Think about it. You have these persistent containerized application images that within seconds are spun up or down as needed and balanced across multiple nodes or data-center locations to achieve the best in quality of service (QoS). But, what if you don't want to be bothered by all the container stuff and instead care only about your application along with its functions? This is where Amazon's Lambda helps. As I mentioned in Part I, with Lambda, you don't need to be concerned with the container. Just upload your event-driven application code (written in Node.js, Python, Java or C#) and respond to events, such as website clicks, within milliseconds. Lambda scales automatically to support the exact needs of your application.
As for the types of events (labeled an event source) on which to trigger your application, or code handlers, Amazon has made it so you can trigger on website visits or clicks, a REST HTTP request to its API gateway, a sensor reading on your Internet-of-Things (IoT) device, or even an upload of a photograph to an S3 bucket. This API gateway forms the bridge that connects all parts of AWS Lambda. For example, a developer can write a handler to trigger on HTTPS request events.
Let's say you need to enable a level of granularity to your code. Lambda accommodates this by allowing developers to write modular handlers. For instance, you can write one handler to trigger for each API method, and each handler can be invoked, updated and altered independent of the others.
Lambda allows developers to combine all required dependencies (that is, libraries, native binaries or even external web services) to your function into a single package, giving a handler the freedom to reach out to any of those dependencies as it needs them.
Now, how does this compare to an Amazon AWS EC2 instance? Well, the short answer is that it's a lot more simplified, and by simplified, I mean there is zero to no overhead on configuring or maintaining your operating environment. If you need more out of your environment that requires access to a full-blown operating system or container, you'll spin up an EC2 virtual instance. If you need only to host a function or special-purpose application, that is where Lambda becomes the better choice. With Lambda, there isn't much to customize—and sometimes, less is good.
If you recall from Part I, in the cloud, multiple local volumes are pooled together across one or more sites and into a larger set of storage pools. When volumes are requested in block, filesystem or object format, they are carved out of those larger pools. Let's look at some of these AWS offerings.
Elastic File System
The Amazon Elastic File System (EFS) provides users with a simplified, highly available and very scalable file storage for use with EC2 instances in the cloud. Just like with anything else offered by Amazon, the storage capacity of an EFS volume is elastic in that it can grow and shrink dynamically to meet your application's needs. When mounted to your virtual machine, an EFS volume provides the traditional filesystem interfaces and filesystem access semantics.
To create a new EFS volume, select EFS from the main AWS dashboard and then click on the "Create file system" button. You'll be directed to a screen where you need to configure your new filesystem. To simplify things, let's select the same Security Group used by the EC2 instance from the previous example.
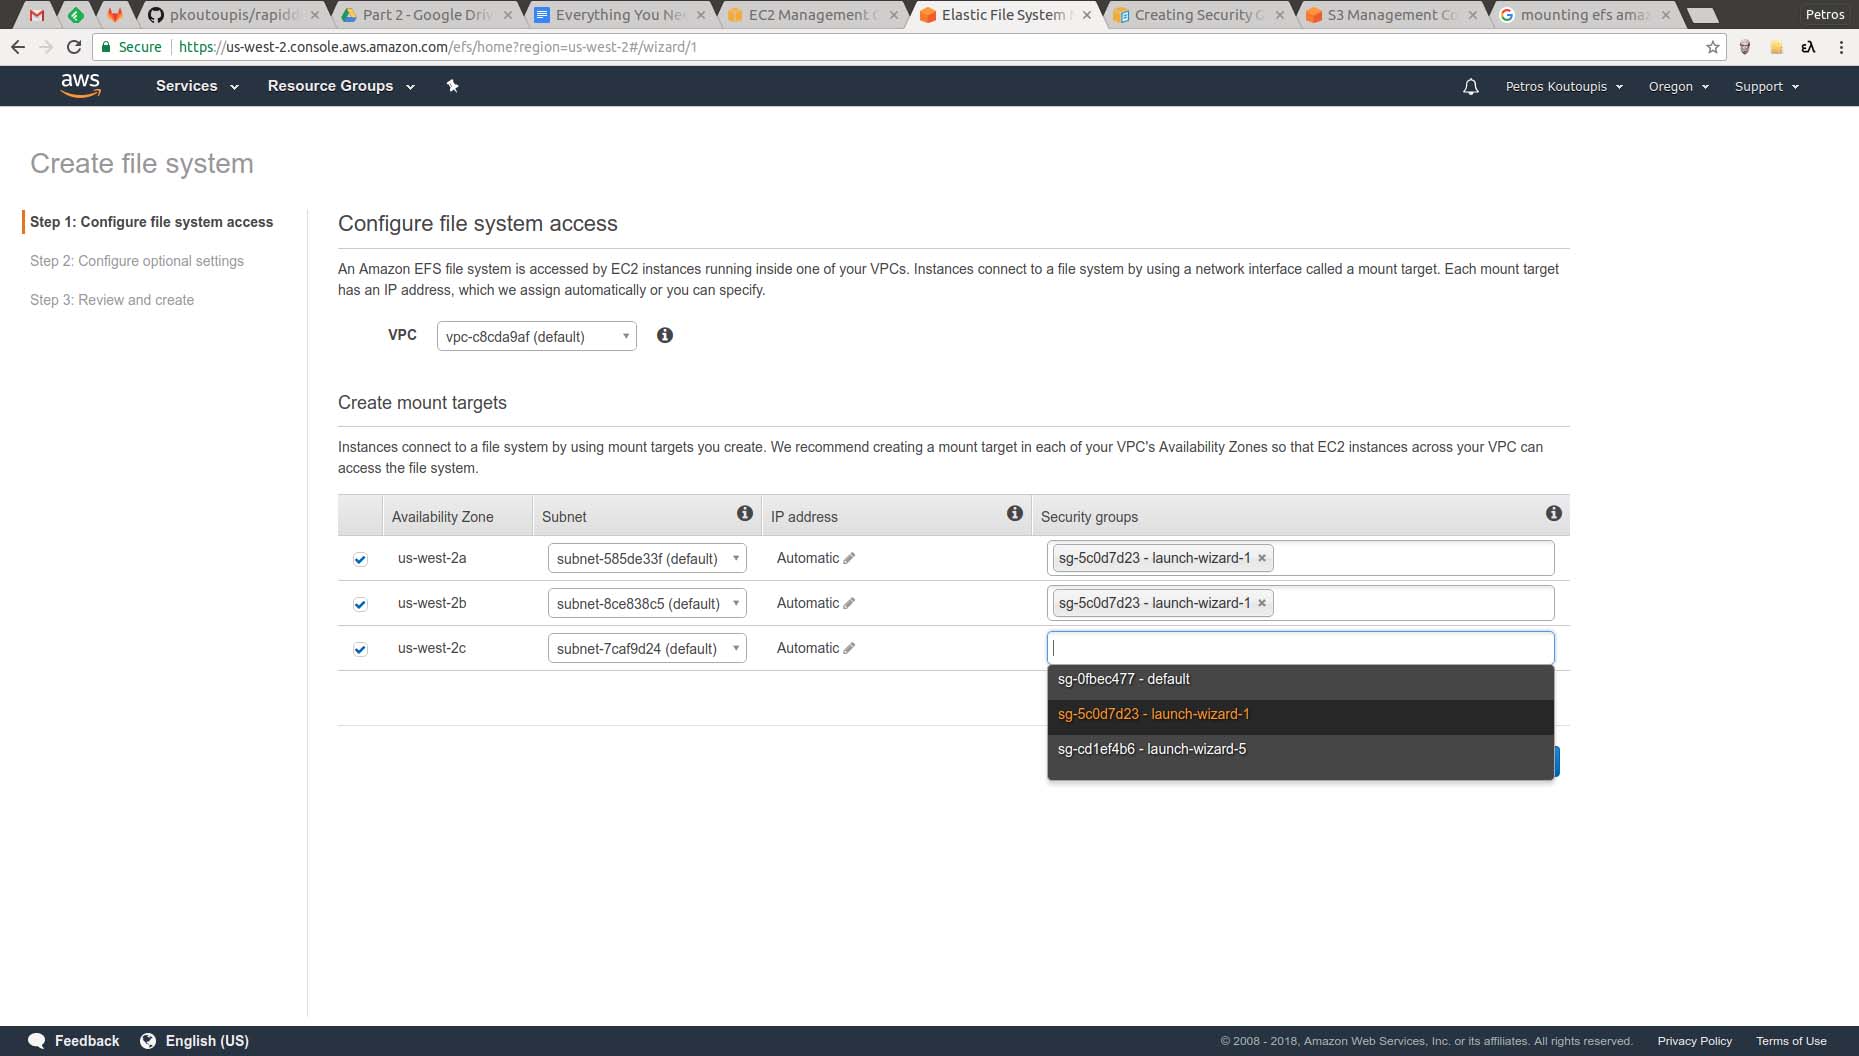
Figure 6. Creating a New Filesystem and Assigning It to a Security Group
Next, give your filesystem a name and verify its options.
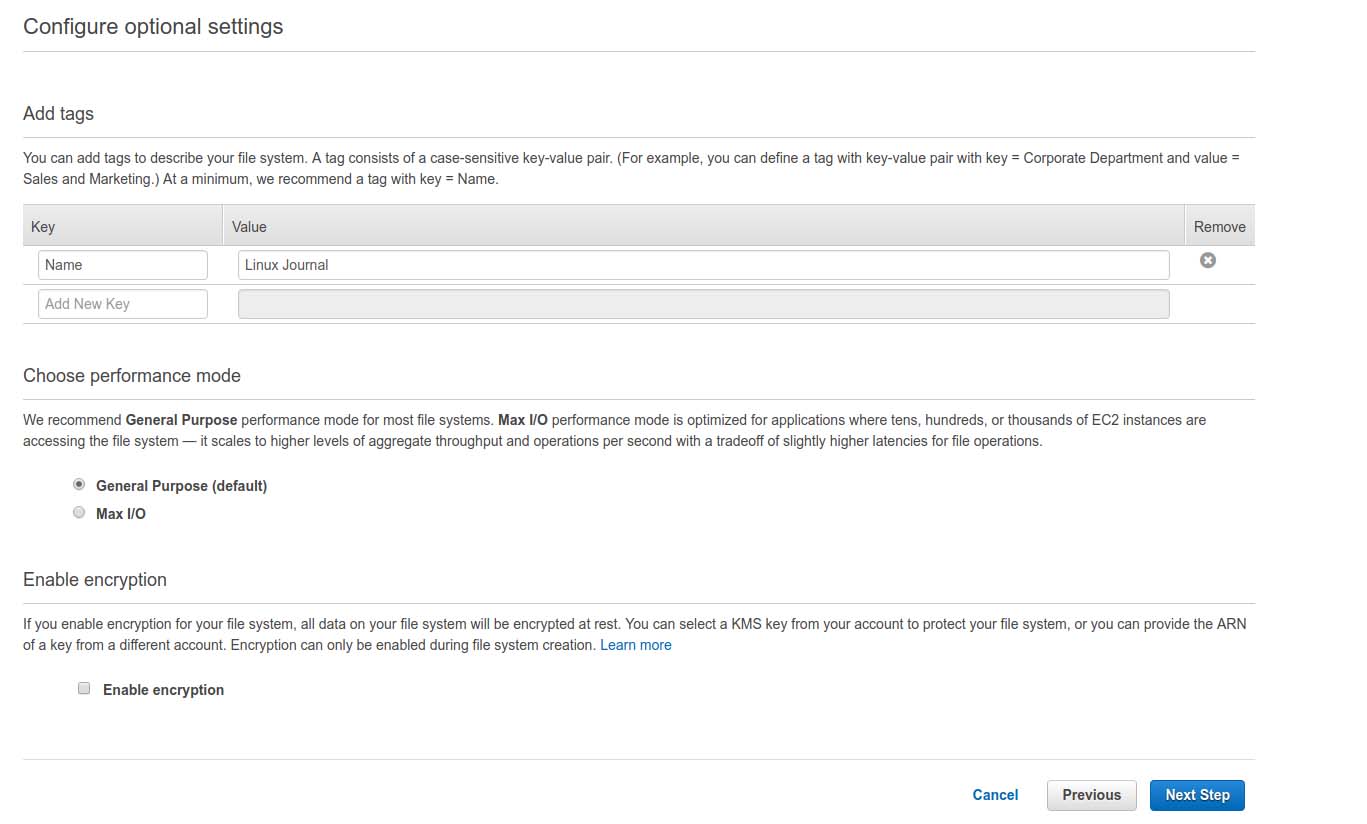
Figure 7. Setting a Name and Configuring Options
Once confirmed and created, you'll see a summary that looks similar to Figure 8. Note that the filesystem will not be ready to use from a particular location until its "Life cycle state" reads that it's available.
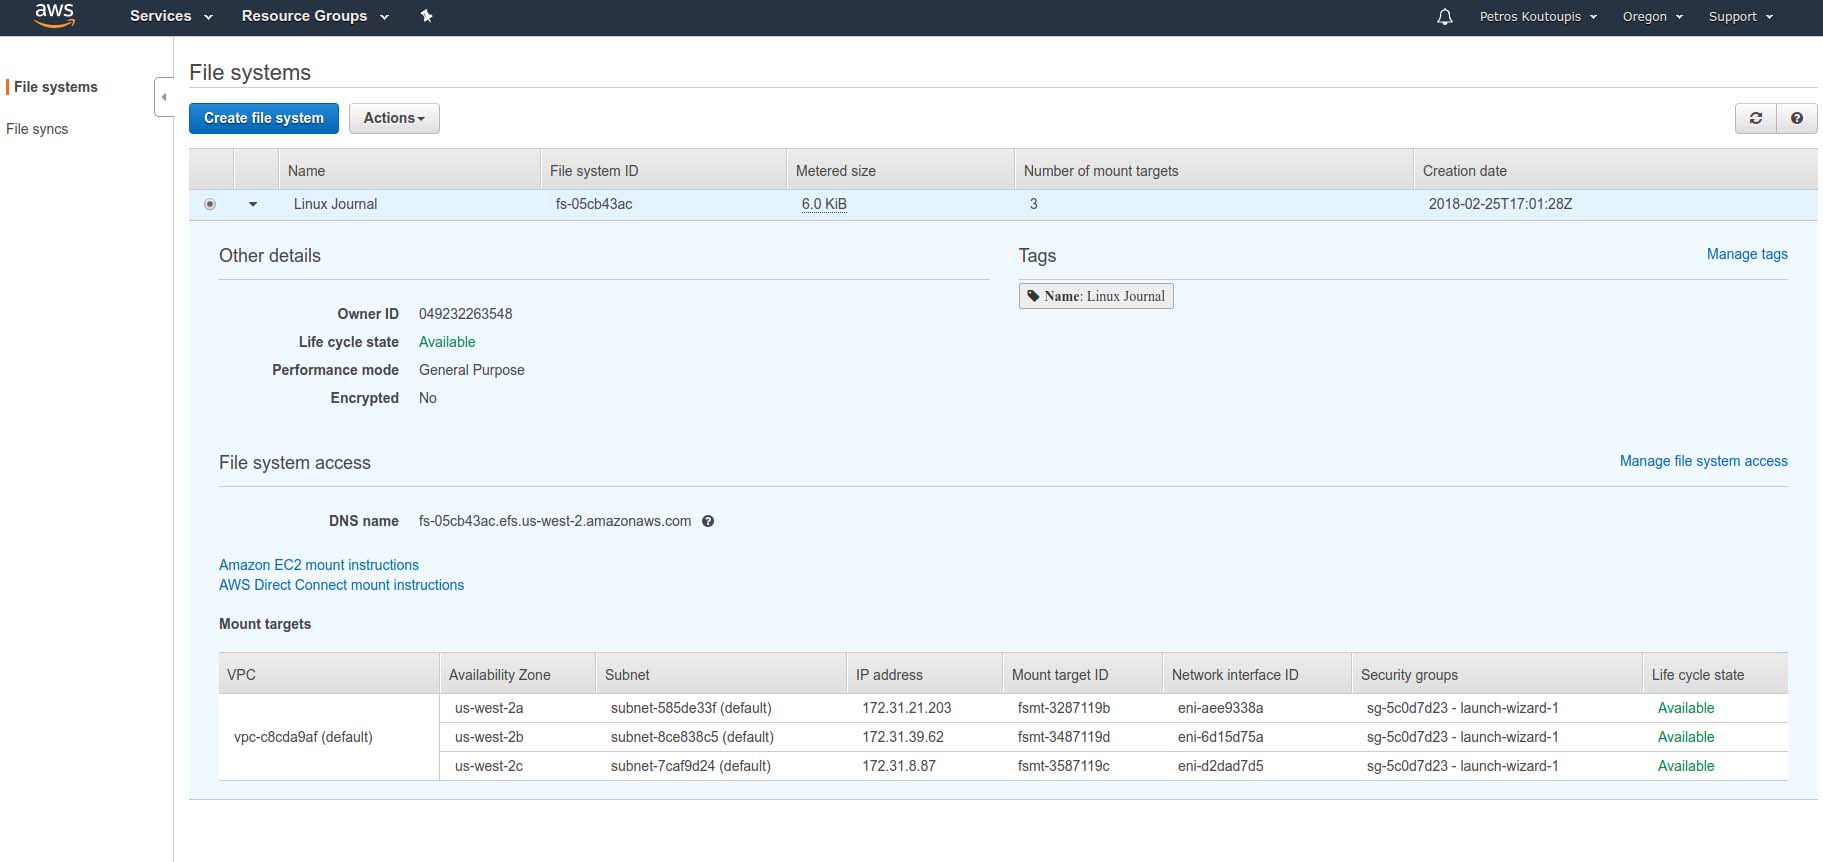
Figure 8. Filesystem Summary
Using the same EC2 instance, install the NFS packages from the distribution's package repository:
$ sudo apt-get install nfs-common
Before proceeding, you need to add NFS to your Security Group. This applies to both inbound and outbound traffic.
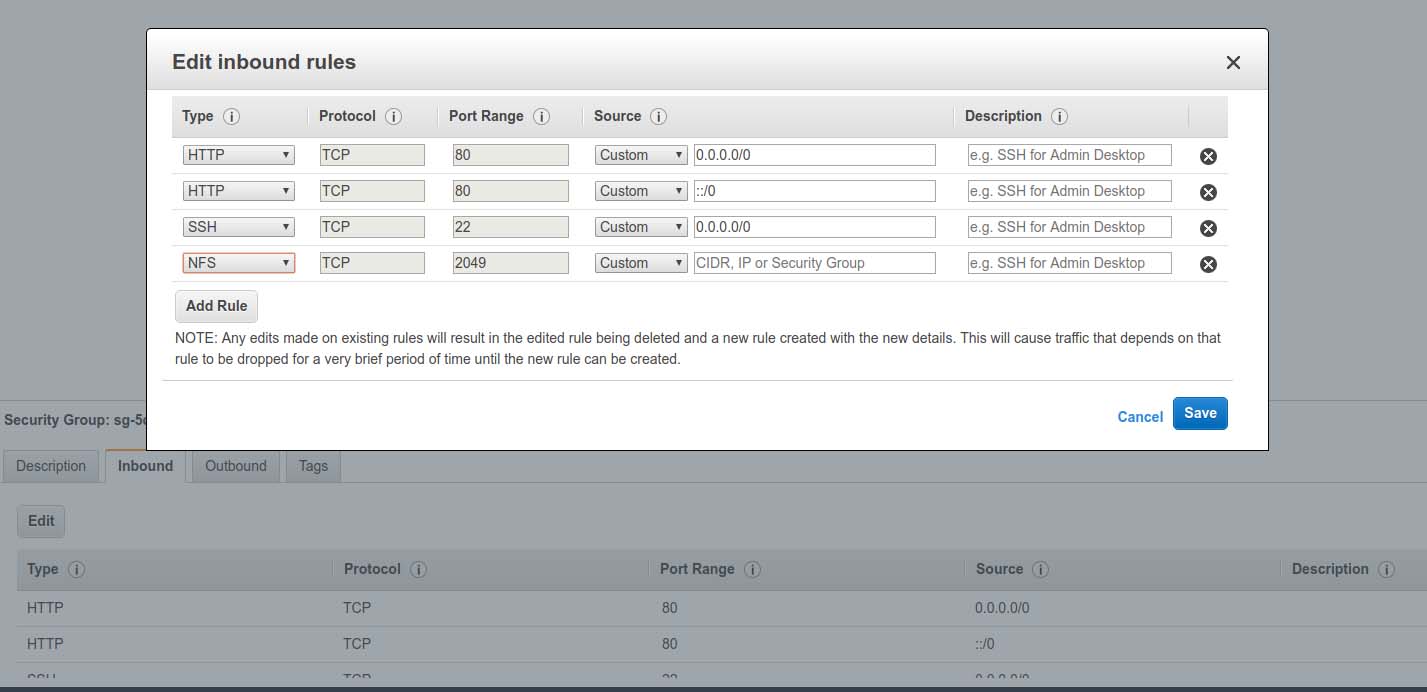
Figure 9. Adding NFS to Your Security Group
From the console of your virtual machine instance, mount the NFS filesystem:
$ sudo mount -t nfs4 -o nfsvers=4.1,rsize=1048576,wsize=
↪1048576,hard,timeo=600,retrans=2 fs-05cb43ac.efs.us
↪-west-2.amazonaws.com:/ /mnt
Verify that the volume is mounted (note: in the last line below under Filesystem, the name is truncated so the output would all fit; that entry should read fs-05cb43ac.efs.us-west-2.amazonaws.com):
$ df
Filesystem       1K-blocks    Used        Available Use% Mounted on
udev                499312       0           499312   0% /dev
tmpfs               101456    3036            98420   3% /run
/dev/xvda1         8065444 1266640          6782420  16% /
tmpfs               507268       0           507268   0% /dev/shm
tmpfs                 5120       0             5120   0% /run/lock
tmpfs               507268       0           507268   0% /sys/fs/cgroup
tmpfs               101456       0           101456   0% /run/user/1000
fs-05...  9007199254739968       0 9007199254739968   0% /home/ubuntu/efs
And there you have it! An EFS volume is now connected to your EC2 instance, and you're able to read from and write to it like any other filesystem.
S3
The Simple Storage Service (S3) supplies applications a front end to store and retrieve millions if not billions of data content from buckets at massive scale. Traditional filesystems aren't capable of cataloging such a large listing of data and, in turn, serve that data within a reasonable amount of time. Object storage solves that. It isn't a filesystem but instead a high-level cataloging system. When you PUT a file into your bucket, you do so with a tag ID. Then when you GET that file from the same bucket, you request it by the same tag ID.
At a high level, you don't see how the data is stored or managed, and technically, you shouldn't care. Each object storage solution has its own methods by which they save object content, and sometimes it's as simple as saving each individual object as a file under a nested directory structure and on top of a traditional filesystem but then not making this visible to the end user or application. The application will access this data or bucket by using a REST API and communicating to the bucket's endpoint over HTTP.
Amazon's S3 API has become somewhat standard, and other object storage solutions maintain compatibility with this API alongside their very own. The motivation hopefully is to migrate those same AWS S3 users over to that other object storage platform.
Glacier
Amazon's Glacier offers its users an extremely secure, durable and low-cost (as low as $0.004 per Gigabyte per month) alternative to data archiving and long-term backup hosted on their cloud. It is a way for most companies to ditch their age-old and very limited local file servers and tape drives. How often has your company found itself struggling either to reduce the consumption or add to the capacity of their local archive system? It happens a lot more often than you would think. Glacier alleviates all of that headache and concern.
When I stepped into the data storage industry more than 15 years ago, it was a very different time with very different customers. This was the era of Storage Area Networks (SAN) and Network Attached Storage (NAS). The cloud did not exist. Our customers were predominantly mid-to-large enterprise users. These companies were single vendor shops. If you were an HP shop, you bought HP. EMC, you bought EMC. NetApp, you bought NetApp, and so on. From the customer's point of view, there was a level of comfort in knowing that you needed to interact only with a single vendor for purchasing, management and support.
About a decade ago, this mentality started to change. Exciting new technologies cropped up: virtualization, flash and software-defined everything. These same technologies eventually would enable the then future cloud. Customers wanted all of those neat features. However, the problem was that the large vendors didn't offer them—at least not in the beginning. As a result, customers began to stray away from the single-vendor approach. What that meant was multiple vendors and multiple management interfaces. Now there were too many moving parts, each needing a different level of expertise in the data center.
There was a light at the end of the tunnel, however: enter OpenStack. OpenStack glued all of those moving components together (that is, storage, compute and networking). The project is an Apache-licensed open-source framework designed to build and manage both public and private clouds. Its interrelated components control hardware pools of processing, storage and networking resources, all managed through a web-based dashboard, a set of command-line utilities or through an API. Even though OpenStack exports and publishes its own unique API, the project does strive to maintain compatibility with competing APIs, which include Amazon's EC2 and S3.
OpenStack's primary goal was to create a single and universal framework to deploy and manage various technologies in the data center dynamically. Originally started in 2010, an effort jointly launched by Rackspace Hosting and NASA, the project has since grown exponentially and attracted a wide number of supporters and users. The secret to OpenStack's success is convergence. By providing a single and standardized framework, it brought order back to an almost unmanageable ecosystem. Its recent popularity should come as no surprise.
Modern company-backed Linux distributions—which include Red Hat Enterprise Linux (RHEL), SUSE Linux Enterprise Server (SLES) and Ubuntu Server—have gone to great lengths not only to simplify the technology but also to support it. And although I don't spend much more time discussing the technology here, as it deserves its own dedicated write-up, let me state that if you desire to run your very own private cloud deployment, OpenStack is definitely the way to do it.
In closing, why use the cloud? If the following list doesn't convince you, I don't know what will:
The availability of a public cloud platform that offers best-of-breed performance, an incredibly wide and ever-growing selection of services, and global coverage is a powerful and, it could be said, necessary, addition to your IT strategy. With larger organizations, you may have to plan on building your own internal cloud for certain types of workloads—and the availability of OpenStack grants the best of both worlds in terms of scalability, ownership and utilization of existing data-center assets.
There is a lot I didn't cover here due to space limitations—for instance, AWS (and other cloud providers) add very advanced security options to limit access to various resources and do so by creating user and group policies. You also are able to expand on the rules of the security groups used by your EC2 instances and further restrict certain ports to specific IP addresses or address ranges. If and when you do decide to leverage the cloud for your computing needs, be sure to invest enough time to ensure that those settings are configured properly.
Petros Koutoupis, LJ Contributing Editor, is currently a senior platform architect at IBM for its Cloud Object Storage division (formerly Cleversafe). He is also the creator and maintainer of the RapidDisk Project. Petros has worked in the data storage industry for well over a decade and has helped pioneer the many technologies unleashed in the wild today.