
Kan Liang recently tried to get some networking configuration code into the kernel that would interpret a simple set of user policies in order to tweak the networking code in subtle ways to speed up data transfers as much as possible.
Unfortunately, although his ideas seemed sound to folks like Stephen Hemminger and Alexei Starovoitov, they both objected to including code in the kernel that wasn't strictly necessary. They felt the same features could be achieved entirely in user space.
Kan's argument that a user-space implementation would be more complex and difficult fell on deaf ears. The same argument has been used many times before, but the kernel folks have to take a hard line on the issue or risk the kernel being overrun with bloat. Some even would argue that this already has happened.
Because of this, unless Kan finds a better argument, it doesn't seem likely that his code will get into the kernel, although it could very well become a tightly integrated user-space tool.
William C. Roberts recently posted some code to randomize the locations of new memory allocations. This is a standard security technique, but William wanted to apply it by default to all mmapped memory regions.
Various folks objected that Android had experienced particular problems with this sort of thing in the past, as it caused extreme memory fragmentation that inevitably would lead to the failure of all attempted memory requests.
The solution, as suggested by Dave Hansen, turned out to be simply to disable William's patch on 32-bit systems. Once this idea was presented, everyone immediately agreed that it would solve the problem. Even William liked it.
Presto—an extremely rare case of a security issue having a simple, clean solution that everyone agrees on.
Luis R. Rodriguez and others have been simplifying the very complex Linux boot procedure, in part by removing support for early access to device firmware. Their hope was that kernel devices could access firmware at a slightly later time in the boot process, after the firmware could be made available on a mounted filesystem.
As it turned out, however, there were more pieces of code and more use cases, such as embedded systems, relying on early access to firmware than Luis had realized. After some discussion, it became clear that support for a few remaining users of early firmware access would have to remain in the kernel, at least for now, and that a more gradual approach to rooting out the remaining users would have to be taken.
Rafael J. Wysocki recently proposed a new kind of runtime driver dependency, in which a given driver could be loaded only if the drivers it depends on are also loaded, and may be unloaded only if no other drivers depend upon it.
It turns out there are some nuances to get right before something like this really could be accomplished. For one thing, the code to implement dependencies might look awfully similar to the existing code to probe for resources before loading a given driver. It would be important to avoid too much code duplication, which might require refactoring that entire area of the kernel source.
There's also the question of when a dependency might be identified. For some drivers, certain dependencies would be clearly known and could be registered in a configuration file. For others, a dependency would be based on which other drivers already had been loaded and could provide certain resources, so there would have to be at least two phases of dependency identification.
Some dependencies also might be “weak”—useful if present, but not absolutely needed for normal operations.
After some discussion, Rafael posted some code implementing the beginnings of his idea. There seems to be general approval of the overall concept. The only issues are exactly how to support the various features and how to avoid too much complexity in the implementation.
Usually bird-related apps involve pigs and anger, but if you're a bird watcher like myself, there's another bird app you must download. Cornell Labs has released a free app called Merlin Bird ID that helps identify birds you see in the wild.
Hundreds of books are available to help you figure out what sort of bird you're looking at, but Merlin uses several metrics to narrow down the feathery mystery. It uses:
Size.
Color(s).
Geographic location (via GPS).
Time of year.
Environment (on tree, in water, on ground and so on).
Once it narrows down the options to a handful of birds, it provides photos of the male, female and juvenile varieties. It even includes a button that lets you listen to their particular birdsong.
If you're a bird-lover, or just like to sound smart in front of your friends, the Merlin Bird ID app is a must-have. It's completely free and remarkably accurate. Find it on the Google Play store today!
For this article, I thought I'd introduce another chemistry application—specifically, BKChem, a free chemical drawing program. As opposed to many other chemistry applications, BKChem provides both a nice GUI for constructing molecules and a set of chemical analysis tools to look at the properties of the newly constructed molecule.
Most distributions should have a package available to make installation easier—for example, Debian-based distributions can install BKChem with the following command:
sudo apt-get install bkchem
Once BKChem is installed, you can start it either from the menu entry or by executing the command bkchem from a terminal window.
When it first opens, you'll see a blank screen where you can start your chemical construction.
If you have a previously created molecule, you can load it by clicking the File→Load menu item, which will load the data into a new tab, or you can click the File→Load to the same tab menu option to load it into the currently active tab.
BKChem also can import data from other file formats. If you click File→Import, you'll see that you can import files with CML, CML2 or Molfile formats.
If you want to start by building your own molecule, several menus of building blocks are available. They are laid out as a pair of rows, just below the menu listings at the top of the window. The top row of icons selects which list of icons will be available in the second row. The first icon in the first row is simply an arrow, allowing you to select objects within your molecule so you can edit their properties. The next icon pulls up the row of drawing elements where you can start to draw your new molecule.
There are several choices in terms of line thicknesses, styles and bond angles, and you can create a chain of elements simply by clicking on the end of an existing line segment.
Once you have the basics of your structure laid out, you'll want to edit the details next. To do this, click on the first icon again (captioned with “edit”), and then click on the structure element you want to edit. This is where having a proper mouse is a must, as you need to click with the middle button on your mouse to pull up the edit panel.

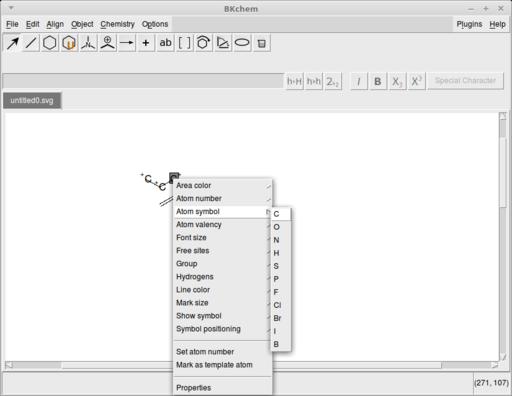
Figure 2. You can edit an element by clicking the middle mouse button. The menu you get depends on the type of element you are editing.
If you are using a laptop touch panel, you need to click the left and right buttons together and then scroll with the touch pad itself. As an example, if you click on an atom, you can change the atom in this location or even replace it with some type of atomic group, such as an alcohol group.
You also can edit all kinds of display options, such as colors used, fonts for text, text placement and line widths.
The third icon on the top icon row pulls up a list of available templates for larger commonly used atomic structures, such as benzene rings.
The fourth icon on the top row lets you pull up a list of templates that you have created previously, allowing you to add templates for those substructures that you use most often.
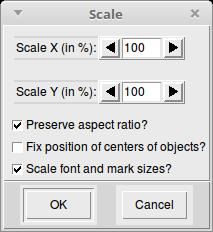
You may need to play with the display in order to be able to see everything clearly while you are working. The appropriate instructions are under the Object menu item. The first option on that menu is Scale. Selecting either a portion of your structure or the whole thing, you essentially can zoom in or out to see the structure better as you work on it.

Figure 4. You can scale parts of your molecular structure to make it easier to work on.
You also can make changes to the display, such as altering the stack layers or mirroring horizontally or vertically.
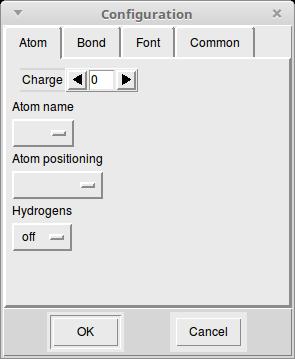
The last option available is the Object→Configure menu item. This will pop up another window where you easily can change atom, bond, font or common details for the display. This is also the same window that appears when you click on the Properties item on the Edit menu (which you get when clicking the middle mouse button).

Figure 5. A configuration window allows you to edit properties of your structure's elements easily.
So far, I've just been describing building up a molecule. In the rest of the screenshots here I'm using a simple benzene ring to discuss the chemistry you can do with BKChem.
You can get basic information about your structure by clicking on Chemistry→Info, which will pop up a new window with items like the chemical formula, molecular weight and composition.
If you want to check to see whether the structure you've built makes sense, you can select it and click on the Chemistry→Check chemistry menu item. If everything makes sense, you'll see a new window telling you that everything is okay. Otherwise, you'll get an error message highlighting what doesn't quite work from a chemical point of view. This is where you may need to dig into the grittier items available from the Edit menu when you click on an element with the middle mouse button. You may need to change the type of atom or change its valency. As an example of the type of error you might encounter, see what happened when I changed one of the carbon atoms to an oxygen atom in the benzene ring (Figure 7).
At the far right side of the menu bar, there is an entry for available plugins. One of these plugins allows you to calculate bond angles. You can select two connected bonds by holding down the Shift key and clicking them one after the other. Then you can click on the Plugins→Angle between bonds menu item to calculate the angle.
When you've finished all of the work of creating your new molecular structure, you'll want to save it for further analysis or to share with other researchers. The default file format that structures are saved in is an SVG (Scalable Vector Graphics) file. If you want to save your work using a different file format, click on File→Export to get a list of all the supported file formats. Most of them are simply other graphics file formats, but a few are specifically used for storing chemical information.
You can select CML or CML2 (Chemical Markup Language) to save more of the chemical information for your structure. You also can save your structure in the molfile file format, which was created by MDL Information Systems to store more detailed information about a chemical structure. If you just want an easily shared image of your molecular structure, you can export it into either a PDF or PNG file.
As you have seen here, you can use BKChem to build molecular structures in a way similar to many other chemistry applications. What is slightly different with BKChem is that you can do some basic chemistry with your newly created structure directly from BKChem. This added functionality might be enough to make BKChem a tool you'll want to add to your arsenal.
Some tools that I use on the command line are so basic and so ingrained in my day-to-day actions that it's weird when they're not available. This often happens to me on OS X. I love that OS X has UNIX underpinnings. I love that the terminal window is a real terminal window and works like a terminal window should work.
But, I don't like the lack of basic tools that are available. Even more, I dislike that I can't simply apt-get (or yum) the missing applications into my system. Thankfully, I'm not alone. If you've ever opened a terminal window on OS X and tried to use wget, you know the feeling too. Enter: Homebrew.

(Image from brew.sh)
The concept of Homebrew has been around for quite a while. Fink, MacPorts and probably a few others give you the options to install software that isn't part of OS X itself. Those other options make me uncomfortable, however, because they're more integrated into the UNIX ports system. It might seem odd that better integration makes me uncomfortable, but it does. I'd rather have something I can erase easily without affecting the rest of the system. I'd rather have the non-native applications live separately from the native apps. Part of that is personal preference, but part of it is based on years of experience with troubleshooting problems. If there's a problem with Homebrew, it's much easier to troubleshoot.
Anyway, if you'd like to have a package manager for some of the “missing” programs in OS X, but you'd also like to be able to delete the entire system fairly simply, Homebrew is perfect for you. Simply head over to brew.sh (cool URL, right?) and paste the installation script into a terminal window. There's an un-install script as well, or you simply can delete the bits manually. Even if you're just curious, it's easy to install Homebrew and give it a go. In fact, thanks to its simple install/un-install and the incredible convenience of having common tools available on OS X, Homebrew gets this month's Editors' Choice award. If you have a Mac, check it out.
Most of you have a web server installed on your network somewhere. In fact, most of you probably have several. In a pinch, however, getting to the web directory can be difficult. Thankfully, there's a super-simple, incredibly awesome one-liner you can type to get a functional web server running and serving out your current directory:
python -m SimpleHTTPServer
That one-liner (or the Python 3 alternative, python -m http.server) will start a web server on port 8000, serving files from your current directory. Usually pressing ^C will stop the server, but if not, some more command-line fu will stop the process as well:
kill `ps | grep SimpleHTTP | grep -v grep | awk '{print $1}'`
It's possible to change the port by adding it after the SimpleHTTPServer, but since you're running as a user, you won't be able to run on a privileged port.
(Thanks to jafraldo on www.commandlinefu.com for the kill script.)
One must desire something to be alive.
—Margaret Deland
Confidence is 10% hard work and 90% delusion.
—Tina Fey
I must create a system or be enslaved by another man's.
—William Blake
To live a creative life, we must lose our fear of being wrong.
—Joseph Chilton Pearce
There's a place in the brain for knowing what cannot be remembered.
—John Green
I'm a bit of a weather nut. It might be because I'm getting older, but for some reason, the weather fascinates me. I'm not quite to the point that I watch The Weather Channel on a regular basis, but I do check the forecast often.
I also spend the vast majority of my day in a terminal window. Until recently, if I wanted to check the weather, I had to open a browser and click a link in order to get the forecast. Thanks to Igor Chubin (@igor_chubin on Twitter), I now can get the forecast from the comfort of my terminal window. All you need to do is type:
curl wttr.in/your_town
and you'll get a nice text-based graphical forecast. You also can view the page in a web browser if you prefer (it looks cool there too), but being able to whip up a forecast on the command line is just awesome. I've tried using city names and zip codes, and both seem to work well. If you want to know what the weather is like, but don't want to open a window, give it a try!