
Thank goodness that Guarddog's bite is better than its bark.
No, François, I don't notice anything wrong with our Internet connection. Ah, I see, you installed a new firewall and now you can't get out. Hmm...let me have a look at that configuration. I think I see the problem, mon ami. Your configuration is completely unforgiving, but you have excellent security. Nothing gets in, but nothing gets out either. Perfectly secure.
Yes, François, I am just kidding. Extreme comparisons are everywhere when it comes to security, mon ami. I've heard it said that the best way to secure a server is to unplug it and leave it in a closet. If we are going to get silly about this, why stop there, I say? Encase the server in concrete and bury it in a lead-lined vault 50 feet below the surface. All joking aside, mon ami, there has to be a balance between acceptable security and a completely unusable system. That's the focus of tonight's menu, and as soon as our guests arrive, we'll serve up some very nice firewall applications.
But they are already here, François. Welcome, everyone, to Chez Marcel, where fine Linux fare and exquisite wines find the perfect match. My faithful waiter will help you to your tables and then he will fetch the wine. The 2002 Belle Glos Pinot Noir from Sonoma sounds perfect—I think you will find it in the North wing where Henri is currently restocking, François.
Linux vendors often provide some kind of firewall with their distribution, but not all do. Normally, you access these through whatever system administration tool your vendor provides. Sometimes the firewall tools are essentially the command-line iptables software. There's nothing wrong with building a firewall using only the command line, but for many, a little directed, simplified, graphical help is quite welcome. The firewall generators I cover today have another advantage besides being easy to use and configure. Both allow you to modify the firewall in real time. Each starts with a very strict configuration for incoming traffic (unless specifically allowed, all traffic is denied). They are also distribution-agnostic. Should you decide to move from one distribution to another, you can use the same tools.
Ah, François, it is good to have you back. Please, pour for our guests.
The first item on tonight's menu, Tomas Junnon's excellent Firestarter, is an easy-to-use, graphical firewall application that provides you with real-time response and configuration of your security rules. When you run Firestarter (command name, firestarter), you are prompted for the root password. The first time you run it, the program starts a Firewall Wizard to help you get started. Because the first screen is basically a welcome screen, read the message, then click Forward.
Next, you'll come to the Internet connection sharing screen. Single-user desktops won't have to worry about this and simply can move forward to the next screen. However, if your PC is going to act as a NAT gateway for other PCs in your home or office, click the Enable Internet connection sharing check box. Once again, you have the option of specifying which Ethernet card (or dial-out connection) you will be using as your default route to the Internet. Right below that, there's an option for providing addresses via a DHCP server. If you don't have the DHCP server package installed on your system, this option is grayed out.
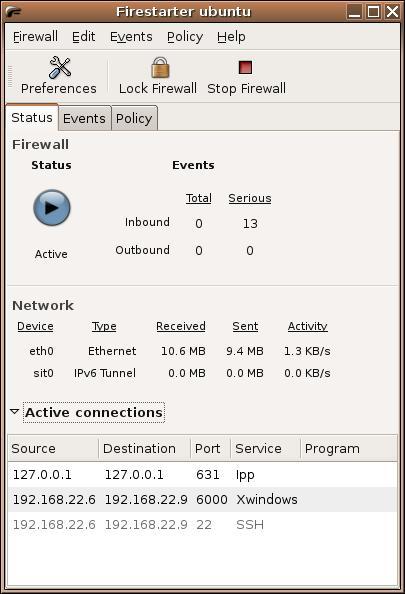
When you have made these selections, click Forward, and you are pretty much done with the Wizard. Look at the screen closely before you click Save and Quit. There's a check box labeled Start firewall now clicked on by default. With the defaults created by the Wizard, Firestarter's rules are fairly restrictive to inbound traffic (as you would expect) and that's not generally a problem. But, as the on-screen tip will inform you, this can be a problem if you are setting this up remotely. Unless you are at the workstation in question, uncheck the Start Now option. We're all done. Click Save, and Firestarter activates your new firewall and launches the status window (Figure 1).

Figure 1. Firestarter's interface is clean and easy to work with.
The interface is simple with a three-tabbed view. The tabs are labeled Status, Events and Policy. The status view is the one you are most likely to be interested in on a regular basis. The display shows the firewall's run state (Active or Disabled), the inbound and outbound connections, as well as the traffic through your various interfaces. At the bottom of the window is an Active connections section that is closed by default. Click the arrow beside the label to view those connections.
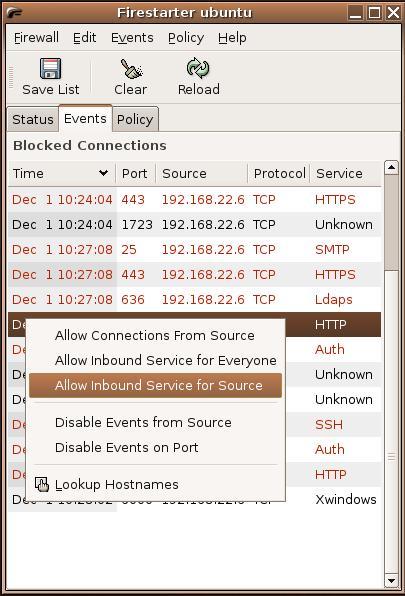
I should point out that Firestarter starts by blocking every inbound service imaginable. Consequently, if you try running it on your server instead of your desktop, you'll find that no one will be able to access anything, including what you might think of as safe services, such as your Web server. All outbound traffic, however, is permitted, so normal desktop functions such as reading e-mail, surfing the Web or chatting on IM clients is unaffected. The Active connections window (mentioned above) shows you all of these attempts to connect as they happen, but they fade out and vanish after a few seconds. To discover what connection events occurred so that you can decide what to allow in, click on the Events tab. There, you will find a log of all traffic to your machine (Figure 2).

Figure 2. Rules to allow traffic can be created on the fly from Firestarter's Events tab.
Right-click on one of these entries and a pop-up menu provides you with a number of options on dealing with these connections. For instance, if this is a port 80 (HTTP service) event, you may want to check Allow inbound Service for Everyone. You may feel differently, however, about a port 22 secure shell connection where you check only Allow inbound Service for Source. To allow a particular IP address (a PC on your internal network for instance), select Allow Connections From Source. You also can choose to stop logging connections either from a particular host or for a particular port number or service.
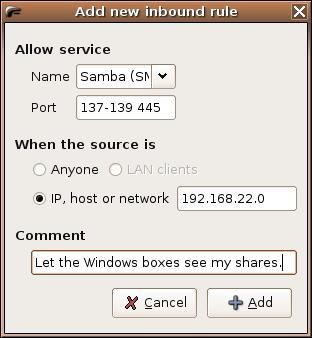
Now, I don't personally think that sysadmins wait to see who comes knocking before they allow certain services into their systems. If you are running a Web server, you probably want port 80 enabled. The same logic applies if you have a Samba server and you need to allow the people in your office to access the shares on that server. To get around this business of dealing with events as they occur, click on the Policy tab. This window is broken up into two horizontal sections or panes. The top one deals with wholesale connections from a specific host or group of hosts, and the bottom pane deals with individual services and the ports on which these services run. If you've added rules using the Events tab, you will see them here. To add other rules without going through the Events dialog, right-click in either the top or bottom pane and select Add rule from the pop-up menu. A friendly little dialog appears to make the process easy (Figure 3).

Figure 3. Adding an inbound rule with Firestarter.
Let's add a rule to allow PCs on my local network to access the Samba service. At the top of the dialog is a drop-down list of possible services (for example, DHCP, BitTorrent, IMAP and so on). I select Samba (SMB) from the list. You will notice that for known services, the port (or ports) will be filled in automatically. Next, use the radio button under the When the source is label to allow everyone or a specific host or network. In this case, I'm adding my own class C network. Finally, I can choose to add some kind of comment in the field at the bottom. Click the Add button and that's it. The new rule appears in the Policy window. Click the Apply Policy button at the top of Firestarter's main window to apply your new policy.
Incidentally, the policies you build here don't require that you be running Firestarter. The program stores the firewall information in the /etc/rc.firewall file. Because this is a boot-level script, the firewall already will be running whenever you reboot your system.
This seems like an excellent time to take a break and relax while François refills everyone's glass. While he does so, let me tell you about another philosophy regarding security. Many years ago, I was informed that the best possible security alarm system you could buy for your house was a dog. Forget the fancy electronic gizmos and remote monitoring, I was told. Get yourself a large German Shepherd. It is perhaps with this thought in mind that the second item on tonight's menu was inspired. Simon Edwards' Guarddog is a graphical firewall configuration tool that looks to bring canine security to your Linux system. Although Guarddog is great for desktops, it is an ideal tool for even complex server configurations.
Before I take you on a little tour of Guarddog, I should point out that it is possible to run it as a nonroot user, but any changes you make will not be saved. That's because root permission is required to modify firewall rules. Obviously, it's better to run this application as root, unless, of course, you just want to learn how it works first. This isn't a bad idea for reasons I'll mention shortly. There is one other warning I want to pass on to you. Guarddog stores its firewall rules in /etc/rc.firewall, and as such, it is possible (though not likely) that you may already have a file there. What is strange here (and maybe a little amusing) is that Guarddog installs a file by this name and can trip over it on startup. Not a big problem, but if you see a message to that effect, just understand that it is probably okay. Let's enter the root password and start the program with full access to the firewall.
Guarddog's main interface consists of four tabbed windows labeled Zone, Protocol, Logging and Advanced (Figure 4). The Zone tab comes with two predefined zones. Local refers to traffic bound for the local address. Internet, on the other hand, is traffic leaving your system and bound for the Internet. This is very important. Guarddog makes it relatively easy to create complex firewalls using demilitarized zone (DMZ) configurations, multiple cards and so on. For now, let's concentrate on a basic desktop firewall configuration. That's one machine connected to the Internet.
As soon as you start Guarddog (command name guarddog) and click Apply, your firewall is activated with all inbound and outbound traffic blocked. As this is a highly restrictive configuration, you are quite safe. Maybe a little too safe—nothing gets in or out; one good reason why you might want to experiment with it by running nonroot in the beginning. This isn't quite as strange as it might seem at first. More complex firewalls with systems in a DMZ are routinely blocked from the internal network with only a few external services turned on. Should you get yourself in a overly secure corner, click the Advanced tab, check the Disable firewall box in the upper left-hand corner, then click the Apply button at the lower right. The Advanced tab also has a button to return your Guarddog configuration to its all-restrictive factory defaults.
One way or another, we need to permit some traffic. Click on the Protocol tab, and you'll see a list of categories representing different types of traffic. They are Chat, Data Serve, File Transfer, Game, Interactive Session, Mail, Media, Miscellaneous, Network and User Defined.
Each has a plus sign beside the category with individual protocols listed in a submenu. Click on each protocol, and you'll see a short description in the bottom-left pane along with an appraisal of the security risk the protocol represents. To the right of each protocol name is a check box. By clicking on the box, each protocol can be blocked, permitted or rejected (Figure 5). As I have mentioned, the port is blocked by default. Click once and the protocol is permitted. Click again and the packet is rejected.
Given the restrictive nature of this firewall, I started out by going down the list of protocols in the Internet zone and permitting everything I needed (for example, instant messaging, e-mail, Web browsing and so forth). This is what you want for a desktop workstation where pretty much all outbound traffic is permitted. Once you have made your changes, click the Apply button at the bottom of the main window to activate your new firewall configuration. A small pop-up window will warn you that any change to a live firewall could have an impact on existing connections. Click Continue to reactivate the firewall.
If you are running some kind of server (such as Samba file sharing), you can almost hear the cute little dog snarling, non? Perhaps you also run the secure shell (SSH), so that you can access this computer from another in your home or office. Click on the Local zone and select those protocols you serve. Remember, this is inbound traffic now, so you probably don't want to be quite as generous.
On that note, I fear that closing time is almost upon us. No need to rush out though. My faithful waiter, François, will happily refill your glasses one final time before we say, “Au revoir”. Please raise your glasses, mes amis, and let us all drink to one another's health. A votre santé Bon appétit!
Resources for this article: /article/8745.