
Today's inexpensive camcorders can shoot great video. All you need to do a real video project is the right editing tools and, of course, practice.
Every camcorder owner would like to turn raw video into something real through editing. It does not matter how much the camcorder box brags of special effects and so forth, you still need proper editing tools. Fortunately, with today's powerful PCs, Linux and an application called Kino, you can put together your own little Hollywood studio.
Kino is nonlinear editor software. It can capture raw video, edit and re-organise it, and export the final results. With additional free, extra-cool plugins, Kino gives you all the necessary tools to make good movies.
Producing a movie usually includes making a recording with a camcorder. We don't cover this, but start with explaining how to copy a recorded raw video onto a PC with Kino. Modern camcorders communicate with PCs through the IEEE1394 interface that Apple calls FireWire; Sony prefers the name i.Link. After capturing, you can edit your raw video, adding titles and creating effects. You also may want to improve your movie by adding, mixing and replacing sounds. Kino supports all of these functions. When your movie is finished, you may want to make a DVD, so you can play it on a standalone DVD player, or even make an MPEG4. The quality of compressed movies is lower than the original raw files, so if you really want high quality and to use all the advantages of your digital camcorder, you also can copy the movie back to the DV tape with Kino and your camcorder.
To send the video stream from a camcorder to a PC and back, you need an IEEE1394 interface on both sides, the PC and camcorder. Check your PC; many modern computers, including laptops, have this interface already built-in. If not, you can buy an IEEE1394 card separately from many vendors. You certainly need a digital video camcorder. Your camcorder probably is either Digital 8 (D8 for short) or MiniDV.
To connect the camcorder to the PC, you need a cable. Camcorders usually have four-pin female connectors, and PCs have six-pin connectors. Take a look at your computer (or IEEE1394 card) and buy a 4-4 or 4-6 cable if you do not have the correct cable.
Obviously, you need a PC equipped with a large capacity hard disk. You must have a lot of free space. For instance, to copy a 60-minute MiniDV tape to your computer, about 12Gb is necessary. Further work might need about 15Gb for edited frames and sounds, so 27Gb of free space is the absolute minimum for making a movie from one hour of raw video. Depending on what you want to do, you may need an extra 14Gb to export your results to a new .dv file. While capturing, the computer has to record about 3.5MB per second, so the hard disk should work as quickly as possible. Any modern Ultra-DMA drive works if configured properly.
A 1GHz processor and 128MB of memory is the absolute minimum suitable configuration for working with video. To work comfortably, you could use more memory and possibly a more powerful CPU.
As far as software, you need Kino and the libraries it uses, but this is not everything. Kino provides only basic tools for editing and has few effects. Tim Shead and Dan Dennedy have been developing timfx, a set of Kino plugins that adds extra effects. Another plugin, called dvtitle, by Alejandro Sierra is needed for adding titles.
Because Kino requires additional programs and libraries, installing from source is not a simple task (see the on-line Resources section for Kino's home page). Kino is available as a package for several distributions, including Debian, SuSE and Fedora. Installing a package is much easier than building from source.
Kino development is progressing quickly. While writing this article, the latest version was 0.7.3. In Debian 3.0 (stable), the Kino version is 0.5.0, and Debian 3.1 (the developing branch) suggests the latest version is 0.7.3. SuSE 9.1 suggests using Kino 0.7.0. To help you keep the programs up to date we created all necessary packages. See Resources for links.
Once the software is installed, connect your camcorder to the PC by IEEE1394, and run the command kino from any X terminal or, under KDE or GNOME, from the Alt-F2 dialog. The Kino opening window is similar to the one shown in Figure 1.
The GUI is easy to understand. To capture video, choose the Capture tab on the right. Before starting to capture, however, it is best to check your preferences. Click on Edit→Preferences to see the default settings. Set Normalisation, Audio and Aspect Ratio according to your camcorder. Parameters depend on the camcorder you are using and the country where you bought it. The NTSC standard is used in the USA, Canada and Japan, and the PAL standard is used everywhere else. Camcorders usually have two audio modes, 16 bits and 14 bits, and the latter often is set by default. Change this to 16 bits before recording for better quality.
Captured frames can be stored in three formats, .dv and two kinds of .avi files. Generally, it does not matter which kind of format you use; we prefer to use raw DV.
After setting your preferences, press Capture, and enter a filename for the captured video without using an extension. You also can choose the Auto Split Files option so Kino saves each automatically recognised change of scene in a separate file, adding a number to the core filename. You can accept the default settings for all the rest.
Now, set your camcorder so it understands control signals. Usually this is in the Play mode, but check the manual if you are uncertain. Try controlling the camcorder with Kino by moving the tape back and forward. Try pressing the Play button in Kino. The video should start playing, and its output should be displayed in the main Kino window as well as on the camcorder screen. Notice the dropped frames field. Theoretically, this should be zero, but in practice, it's not bad if the first one or two frames are lost. If, however, the number of dropped frames keeps increasing, your hardware is too slow or misconfigured. If you cannot control the camcorder with Kino, try loading the raw1394 driver manually. As root, type modprobe raw1394.
If you have slow hardware, you also can try using dvgrab, a command-line tool for grabbing DV. This program is available from the Kino home page (see Resources). Before using it, exit your X session. Follow the directions from its man page. After grabbing the raw video, you can start Kino and load the captured files for editing as described below.
If the Play option operates correctly, you can start capturing. Go to 1–2 seconds before the position where you want to start, and click Capture. Kino starts the camcorder and captures. Pressing Stop at any time stops the capturing. Video transferred in this way appears in the scene list on the left part of the Kino screen. AutoSplit sometimes works incorrectly, but you can correct that later. Kino's window right after capture is shown in Figure 2.
As soon as you finish capturing, select Save from the File menu, and save the project as a Synchronized Multimedia Integration Language (SMIL) file. An SMIL example is shown in Listing 1. Between the <seq> and </seq> tags, clip descriptions appear. Each one defines a simple or a complex scene. A simple scene is described by a <video...> command that points to the first and the last frames of the clip file that will be used in the movie; a complex scene is a set of simple scenes. The first frame of each scene is shown in the left panel of the Kino Storyboard.
If your movie is assembled from many different tapes, put a new one in the camcorder and repeat the above steps.
In the storyboard near the first frame of a scene, you can find useful information, such as the name of the file where the scene is located, the time mark from which the scene starts and the duration of the scene.
While capturing, Kino displays the time according to the original source. In edit mode, timecode displays the running movie time. Time can be displayed in many formats. The simplest is the frame format. This is a frame counter that starts from zero. Other formats are much more usable by humans like seconds; minutes also are available. We like to use the industry-standard, Society of Motion Picture and Television Engineers (SMPTE) timecode format, which shows both the time and a frame counter, separated by semicolon. For instance, if you see the time noted as 00:07:40;15, it means 7 minutes, 40 seconds and 15 frames. You can select the time format you prefer from the Time pull-down menu.
Mozart is said not to have written drafts, but not everyone can be like Mozart. If you start recording too early or finish too late, a scene may need to be cut, or you may end up with bad frames, unnecessary frames or frames of the wrong duration. The duration of a scene usually is determined by the action. If there is no action, the scene duration should be no longer than 4–6 seconds. Shorter scenes look like flashes, and longer ones are boring.
To begin editing, look through the scenes. If you find only one or two problem frames in a scene, you either can remove them or split them with the next frame in the case of incorrect AutoSplit. To remove a scene, press the Edit tab on the right, point at the scene you want to delete in the storyboard and click on it. The main window shows the first frame of the scene. Click the scissor icon in the toolbar. The scene disappears from the storyboard, and the next scene's first frame is displayed in the main window.
Often you want to see an overview of the individual frames in a scene. With Kino, you can do this by clicking on Timeline. Figure 3 shows an example of the Kino Timeline.
If only a part needs to be cut from a scene, it should be split into bad and good parts. Use the transport control line to review and locate them. If you click on the split icon in the toolbar, the current frame starts a newly created scene. Be sure the current frame is in the scene you want to delete by clicking Cut. This method works well if you need to delete a central part of a scene. If you want to set the beginning or the end point of a scene accurately, it's better to use Trim.
Trim is a powerful tool for editing. The most basic use is to remedy problems with the first or last frames in a scene. To use Trim, select the scene in the Storyboard and click Trim. You should see a scrub bar and two text boxes; the one on the left is labeled In and the right one is labeled Out, as shown in Figure 4. These boxes show frame numbers for the starting and ending points for the current scene in the clip file. Use the control buttons or the triangle above the bar line to navigate to your new starting position. Use the single frame features for higher accuracy. Having specified the new starting position, click the left triangle below the line to change position. The In text box changes to reflect this selection. To trim the end of the scene, do the same thing with the ending point, and set it by clicking on the right triangle. If you are satisfied, click the red Apply button.
Exiting the Trim mode or choosing a new scene in the Storyboard to edit also applies any changes you made, so be careful while editing.
Under the In pointer is a text field indicating the current mode for trimming. Insert and Overwrite are the two trim modes and are similar to using a text editor. With Overwrite, the currently selected scene in the Storyboard is replaced by the newest one; Insert adds a new scene before or after the currently selected scene. The Insert mode has no Apply button, only Before and After icons. This means you must make your selection to apply the changes.
When all of your scenes or episodes are free of unwanted frames, put them in the right order. An easy way to reorder them is by using Storyboard. Click Edit first, then click a scene in the Storyboard you want to move and click Cut. Then, select the scene you want to follow it, and click Paste. The cut scene appears before the selected scene.
An even easier way to re-order scenes is by using drag and drop. In the Edit mode, click on the scene you want to move, hold down the mouse button and drag it to the required place in the Storyboard list. The scene appears at this position after you release the mouse button. While dragging and dropping, pay attention to the thin line that indicates the current target position. Drop does not work if the target shows a dotted rectangle. You also can insert previously captured video clips into your current movie project. The Commands/Insert Movie button puts the selected file at the current position, and Commands/Append Movie follows it. Inserted files are split into scenes automatically if required.
After your scenes are assembled, the video part of your movie is almost done, but you still can add some of the effects that Kino and timfx provide. Be careful with effects, though—too many effects can distract viewers. You don't have to put an effect on every scene change, just like you don't have to use a new font in every section of a document. The simplest Kino effect is the Barn Door. Let's join two scenes with it.
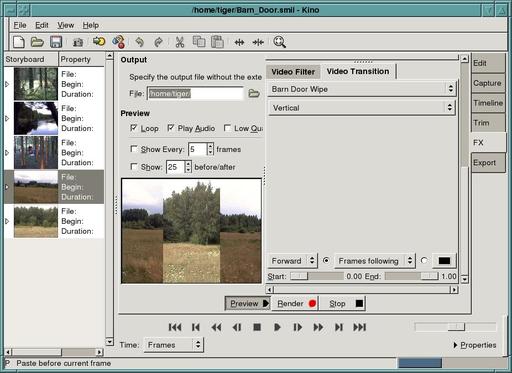
Click FX→Video Transition. Select Barn Door Wipe from the pull-down menu. In the other field, choose what kind of door you want. Figure 5 shows a vertical one. The storyboard shows the first frame of the current scene that we want to join with the next one. So we select Frames following and Forward. To see the result before rendering, click Preview. Play with other options of this effect and preview them. When you are satisfied with a result, press Render.

Figure 5. Making the Kino Barn Door Wipe effect—a preview of the effect is shown in the special window.
The render button has a red spot on it to show its importance. While rendering, Kino creates a new file. All previous editing keeps the original raw files untouched—only the SMIL has been changed. Now you can create a new file that is included into the project automatically.
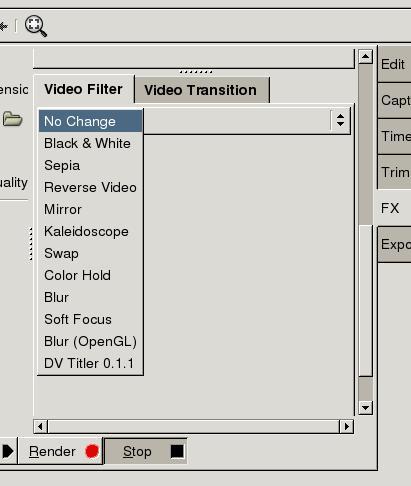
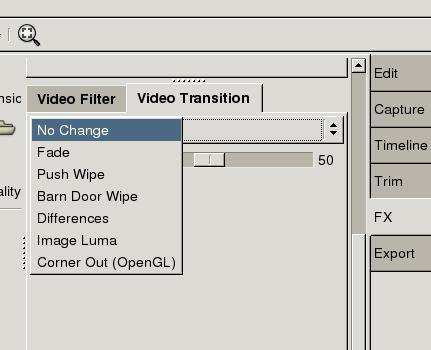
Kino provides the Barn Door effect itself. Additional effects are available through timfx. Figure 6 shows the complete list. Many effects are well known, such as what we illustrate here with creating titles.

Figure 6. Video Filters Menu

Figure 7. Video Transition Menu
Kino also can change the speed of your video. This function is used to add comic effects or make moments seem longer. To change the speed, use the scale bar under Advanced Options and push the Speed button. You also can activate Reverse to play your clip from the end back to the starting point. Changing the speed and reversing can be combined with the Transition or Filter effects.
If you want to add text comments to an episode, dvtitler can help. As an example, let's create a simple album that represents the characters acting in our movie. You even can create it using photos with an image editor such as The GIMP.
First, take a picture of the person and resize it for inserting into the movie. For PAL, the size should be 720×576, for NTSC 720×480.
Let's assume the following for this example. The first person will be shown for five seconds, then there will be four seconds for changing, and then five seconds again for the next actor.
From the FX menu, select Create (5+4)sec*25=225 frames. To keep the number of frames even, we choose Create From File→226 frames, as shown in Figure 8. At the same time, we add the title “Denys Tonkonog”. It consists of two centered lines and initially is located on the top right of the frame. As the final position is the same, the title does not move in the frames. The X offset and Y offset are used to keep the complete title in the frames, even if the movie is shown on TV, due to the possibly limited size of TV screens. The screenshot of the title preview is shown in Figure 9.
We create another title, “Olexiy Tykhomyrov”, in the same manner. Then, we go back to Edit mode and use Split to separate the parts for applying the effect. Instead of creating two title scenes, we create four. They are five seconds in duration, then four seconds, four seconds again and then five seconds. The two central scenes (both four seconds) are joined into one with Image Luma.
In FX mode, click on the second scene under the Storyboard. Under Video Transition, select Image Luma. Next, specify the file with luma image. In the example (Figure 10), we used a standard gradient file left_to_right.png. Do not forget to change the mode from Insert to Overwrite. Once rendered, you have three scenes instead of four. The Timeline of the scene with changing titles is shown in Figure 3. Using Image Luma with different files can help you create many interesting effects.
With Kino, you can change the sound in your scenes completely, add sound to a scene, mix music or leave the soundtracks untouched. Finding suitable music for mixing or replacing might be the most difficult part of the work. For noncommercial projects, check Creative Commons.
Kino works with sounds in WAV format, not MP3. If you have an MP3 file and want to use it in your film, you have to convert it to WAV. We prefer to use mpg123:
mpg123 --wav foo.wav foo.mp3.
If you are using live sound, it's better to export soundtracks from a .dv source because sound is lost with cut video scenes. To edit sound, we use snd. Find the starting and ending points of the scene to use the sounds, then go to Audio. Select the parameters as needed, including From and To (Figure 11). Do not forget to specify the output file without an extension.

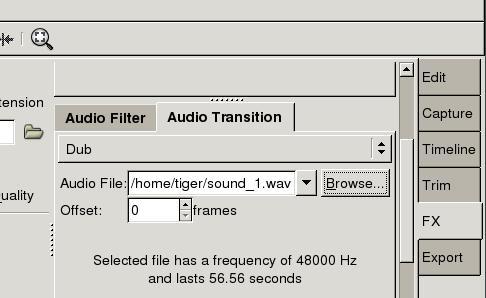
Figure 12. Audio Transition Menu
You can use Split to join several scenes into one in order to apply sounds. Be sure the scene for applying sounds is selected in the Storyboard. Next, click on FX and select Audio Transition. Choose Dub for applying sounds from the file or Mix for mixing the file with what already is in the scene. Add your audio file and preview the scene. Play with the parameters, and when you're satisfied, press Render. Rendering may take some time.
After putting everything together, output the results. Although it is possible to create many output formats, to keep the original quality, we recommend that you output your film back to the tape to save hard disk space. Do this by selecting the Export tab and then IEEE1394 from the menu. Before exporting through this interface, set up the dv1394 device and driver. First, issue one of the two following commands, depending on your camcorder. The command creates the dv1394 device.
For PAL systems the command is:
mknod -m 666 /dev/dv1394 c 171 34
For NTSC systems the command is different:
mknod -m 666 /dev/dv1394 c 171 32
Now, still as root, load the driver with the command:
modprobe dv1394
Next, as an ordinary user from Kino, select Preferences→IEEE1394. A window similar to Figure 13 appears in the screen. If you captured with Kino, the part titled DV Capture is filled in correctly; your camcorder is recognised as a VCR (AV/C) Control device. The camcorder should be turned on so it understands control signals (usually Play mode).
To output through the IEEE1394 interface, change the clue line dv1394 device to /dev/dv1394. Then click OK to close the setup menu. Next, click Export and select IEEE1394. You should see something like Figure 14.
Notice the information line on the bottom of Figure 14. Here, Kino informs you about dv1394 device availability. If it complains, wait about 20–40 seconds. If the error repeats after this interval, read more information about the device on the Linux1394 home page.
Next, select Preview. The movie should start playing on the camcorder screen. Now, put the tape in the camcorder to the position where you want to write, and select the Export button to start writing the movie to the tape. Check what your camcorder indicates according to its User's Manual. Usually it shows a line like DV Input and possibly provides additional DV export information.
If everything is okay, you can stop the camcorder, put the tape exactly at the position from where you want to write the movie and start exporting. The time needed for writing is equal to the movie duration. While exporting, Kino indicates the elapsed and remaining time in the bottom of the export window.
You also can export the movie as a file or a set of files. Kino, with additional programs, provides the following:
A DV file that stores the movie in a new file format, which can be used further for compression and exporting without the Kino interface.
Stills save the movie as a sequence of images in JPEG format.
MPEG codes the movie to MPEG or DivX.
Audio lets you save only the audio tracks.
DV pipe gives you a nice tool to create your own method of saving movies. It also includes standard features, such as exporting to MPEG1 for Video CD or to MPEG2.
Remember that all export features might not work on the box you are currently using; installing extra programs might be necessary. Exporting to a DV file should work and reflect the general rules similar to saving a movie on the tape with the camcorder and IEEE1394 interface.
To export the movie into a single .dv file, select Export/DV File. Disable the option Auto Spilt Files, and specify All as Export Range to export the whole movie from the scene list. Select Type File—we prefer Raw DV. Put zero values into the fields Frame per File and Max File name, as shown in Figure 15. Click Export. Kino starts exporting, indicating the estimated time necessary to finish the process.
Kino still is under development and may crash sporadically when you are using Edit or Trim, so make sure you save your movie project regularly. Although Kino watches the files it creates, it may lose control of them in the case of a crash. In order to keep your hard disk clean, do not forget remove unused .dv files.
The authors sincerely thank Professor Paul Bartholdi, Observatoire de Geneve, the International Centre for Theoretical Physics, Italy, for providing a real Internet connection that is impossible from Dnepropetrovsk National University.
Resources for this article: www.linuxjournal.com/article/7816.