

Ready to turn your Linux box into the ultimate audio effects machine? With the Pd environment, you can build reverb and more, visually.
Pure Data (Pd) is a real-time visual programming environment for audio and other multimedia applications. With it you can make patches that perform operations on audio and visual data. These patches are represented visually; you “draw” where you want the signal data to go and what you want to happen to it. This process is similar to how you program modular analog synthesizers. The process also is well suited to how you end up programming sound and video applications; signals come in and go out, and you manipulate various signals along the way. Due to space constraints, this article covers only the more mature audio capabilities of Pd. If you later want to try the video processing plugins, you should find that many of the concepts are similar to those for audio.
Pd uses two main types of data, messages and audio signals. Messages are sporadic, like MIDI note events. They can contain numbers or strings and are used to pass around information, such as “set the gain on the output to x”. Audio signals are constant; whenever the DSP code is turned on, audio is being transferred. Internally in Pd, audio is represented by 32-bit floating-point numbers. This means that unlike conventional analog or digital sound processing, Pd signals can have nearly any amplitude you want. During processing you can make a audio signal really quiet for one stage and amplify it for another, with no loss in quality. Of course, when the signal is sent to a hardware output, you must make sure it's within the usable range of –1 to 1, or the audio gets clipped.
These messages and audio signals are manipulated by various types of boxes, described below. When put together, this collection of connected boxes is called a patch.
Boxes do all the work. Pd has four main types of boxes: object, message, GUI and comment. These boxes perform operations on messages and audio, provide ways to give user input and document what's been done. Object boxes in turn are divided into two types, control objects and tilde objects. Control objects work with messages and therefore perform their functions sporadically. Tilde objects work with audio data and perform their functions constantly.

Figure 1. An Object Box
Message boxes send their contents to their output port when the user clicks on them or when they receive a message on their input.

Figure 2. A Message Box
GUI simply refers to boxes you can interact with, such as the number box on the left.

Figure 3. A GUI Box
Finally, comments allow you to put text into a patch. They actually don't affect anything.

Figure 4. A Comment Box
Assuming you've compiled and installed Pd by now, you should try to start it. First, make sure you've set the setuid bit on the Pd executable, and make sure it's owned by root. Although this could be a security risk, you need to do this to enable real-time scheduling if you want to run Pd as any user other than root. If you don't and real-time scheduling isn't activated, you'll hear a lot of clicks and pops whenever any other process, even the X server, tries to do anything.
Run Pd with the -rt option and any other options you need in your setup. I'd recommend using -verbose, because Pd itself is not overly chatty and the verbose option does provide some useful information. When that's done you should see a window similar to the one shown in Figure 5. The IN and OUT boxes are peak meters for input and output, respectively, and can be enabled by clicking the peak meters option. If either clips, the respective CLIP box will go red. The DIO errors button flashes if there are any synchronization errors in the input or output. Click on it to see a list of recent errors. Finally, the compute audio check box turns audio processing on or off.
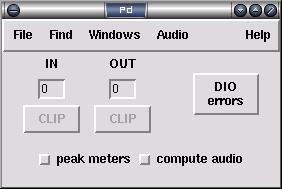
Figure 5. The Main Window
First, let's create a new blank patch in which to work (File→New). From this we are going to create a simple patch to print “Hello World!” to standard output. So, we need a message box to hold the message “Hello World!” and an object box to do the printing. Both of these can be created from the Put menu. You also can use the accelerator keys: Crtl-1 to place the object box and Crtl-2 to place the message box. Once you've done that, to enter the right text in the boxes, click on them and type. You also need to connect the outlet port on the bottom of the message box to the inlet port on the top of the object box. Your patch should look like the one shown in Figure 6. Get out of edit mode by pressing Crtl-E. Now try clicking on the “Hello World!” message box; if all goes well, a message saying so is printed to the terminal in which you started Pd.

Figure 6. The Standard “Hello World!” Example
Now, let's try a more complex example, making a patch that adds two numbers together and displays the result. Make a patch like the one shown in Figure 7, using two number boxes at the top, an object box in the middle and a number box on the bottom. Next, exit edit mode (Crtl-E again), and try changing the numbers at the top. You can do this by clicking and typing or clicking and dragging; move up to increase the number and move down to decrease it. As you've probably noticed, changing the number on the left makes the sum immediately change, but changing the number on the right does nothing. Why?
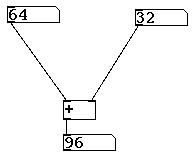
Figure 7. Adding Two Numbers
Nearly all objects in Pd treat their left-most inlet as hot, meaning that any changes in their value affects an immediate change in the output. The other inlets are cold. Changes in their values don't trigger any change in the output. The new value simply is put into storage until a computation is triggered by the hot inlet, at which point the new value is used.
But, what if you do want a change in a cold outlet to trigger a change in output? One way to accomplish this is to inset a message box. In Figure 8, I connected the outlet of the number box on the right to the inlet of a message box. The outlet of that message box then is connected to the hot inlet of the addition object box below it. When message boxes receive any message at all on their inlets, they send all their contents as a new message on their outlets. So when the right-most number box is changed, it sends a message to the bang message box, which then sends a bang message to the addition object box. Bang messages mean “Do something!”, so any object box receiving one on its hot inlet immediately performs whatever computation it's told to do. We use this behavior here to make our addition object box act as though it has two hot inlets.
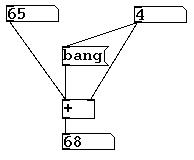
Figure 8. The Naïve Way to Deal with Hot and Cold
But wait, doesn't that mean the bang message has to arrive after the number? If it doesn't, the patch won't work, right? Well, yes; depending on the order in which you made your connections, you already might have noticed that it doesn't. Indeed, in Figure 8 the numbers don't add up precisely because of this problem. So, we need a way to ensure that the bang message arrives after the number. An easy way to do this is to insert a delay, as shown in Figure 9. Interestingly, a delay of 0 actually works. The message simply is delayed by one DSP cycle, thus ensuring that the bang message arrives second.
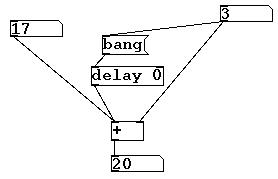
Figure 9. Dealing with Hot and Cold the Right Way
The most basic audio function is input and output. The adc~ tilde object, standing for analog-to-digital converter, performs the first task; and the dac~ object, digital-to-analog converter, performs the second. Both objects operate on the first two channels by default. If you want to change this—for instance, if you have a multichannel sound card such as a Hammerfall HDSP—you can enter channel numbers as arguments, and the respective channels then are mapped to their respective inlets or outlets. Figure 10 shows a simple example where stereo input is flipped and routed to output. Because stereo input is the default, the channel numbers in the example are redundant, but we've included them anyway for demonstration purposes.

Figure 10. Flipping Left and Right in a Stereo Signal
Sound data is a sequence of numbers at a specific sample rate, so it's possible to apply arithmetic operators to sound data. All you have to do instead is add a tilde to the end of the operator you want to use. For instance, Figure 11 turns a stereo signal into a mono one by adding the left and right channels together. Another useful operator is multiply, *~, which acts as a gain control. Remember, though, signals clip when output to hardware if they are beyond the values –1 and 1.

Figure 11. Turning Stereo into Mono
Figure 12 shows a more complex example. You might want to turn your speakers down some before you run this one, because it's loud. First, the osc~ object at the top is a sine-wave generator, in this case running at 440Hz. This signal is split into two, the left side going directly to the addition and the right side first going through a multiplication.
Now try entering –1 into the number box. The sound stops, why? If you remember your wave physics from high school, you know that waves can cancel one another out. In this case, the –1 creates a perfect inverse of the original signal. So where the original is at 1, the inverse is at –1. When you add these two signals together you get 0, silence. You also can try holding down the Shift key and dragging on the number box; the numbers should change slowly enough that you can hear the sound getting quieter as you approach –1 and then finally stopping.
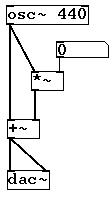
Figure 12. Using Inversion to Cancel Two Signals
Let's put these components together and try to do something useful with them; let's make a simple reverb filter, using the above techniques and one new one, the delay line. If you already have experience with designing sound effects, you probably know what a delay line is; if not, think of it as a buffer for sound. Sound that goes into a delay line inlet is stored for a fixed period of time before it comes out again. All sorts of complicated technologies have been used to implement delay lines in the analog realm, some involving special springs and loops of tape. Fortunately for us, we are dealing with digital signals where a delay line can be implemented with nothing more than a FIFO (first in, first out) buffer.
Reverb is a natural phenomenon caused when a sound reflects off surfaces in its environment. Due to increased distance, these reflections arrive slightly after the initial sound is heard. These reflected sounds also are reflected themselves. Most environments have some degree of reverb, and indeed a carefully controlled level of reverb is a sought-after feature in concert halls. A room without reverb is discomforting, because every sound you make seems like it's been snatched out of thin air.
The heart of this filter is the delay line. Figure 13 shows a delay line adding a one second (1,000msec) delay to the sound input. Delay lines in Pd are named, meaning that to use one you need two separate objects, a writer and a reader. The writer, delwrite~, takes two arguments: the first is the delay line's name, and the second is the maximum delay you want to use in msec. You can have only one writer per delay line. The second half is the reader, delread~, which also takes two arguments: the name of the delay line and amount of delay you want. Unlike the writer half, you can have as many readers as you want, with any delay time you want. An additional type of reader, the variable delay object (vd~), can change its delay in response to an audio signal, but that's beyond the scope of this article.
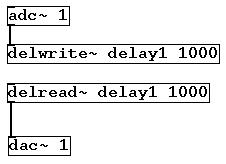
Figure 13. A Delay Line
To recap, a reverb filter needs one straight signal path, the main signal, and one or more delayed signal paths, the reverberations. The reverberations are recursive, so some form of feedback needs to be in the system. Finally, although our inputs and outputs are stereo, in the interest of space we simply implement a mono reverb filter. For this, the incoming left and right need to be mixed together and split at the other end. Figure 14 shows such a filter. If we follow the signal patch from the inputs, the first thing you should notice is the *~ 1 object. This object is included to make the patch a bit cleaner. It multiplies the signal by one, which is useless in itself, but it also gives us an inlet to connect both the left and right channels and mix them into one. You can see a similar structure at the bottom of the patch. The reverb signal then is sent to another multiplier to attenuate the reverberation before it goes through another reverb cycle. The delwrite~ and delread~ form a loop of reverberation. Finally, the outlet of the multiplier is sent back to the dac~.
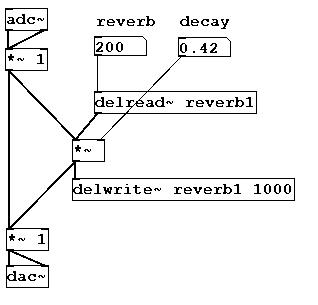
Figure 14. A Simple Reverb Filter
Make sure the MIDI device you want to use, preferably a control device such as the Evolution UC-16, currently is working. An easy way to verify that MIDI events are being received by Pd is to go to the Test Audio and MIDI menu item in the Help menu on the upper-right corner of any window. Open them and generate some MIDI events. If your controller is working and sending out control messages, as opposed to note events, you should see the numbers under the ctlin (control in) object at the bottom of the window change. You may need to play with the -midi command-line argument to Pd to get this working; also, make sure you read the debug messages displayed as Pd starts up by using the verbose option.
If all of this works, try out the patch shown in Figure 15. It's identical to the reverb patch in Figure 14, except the reverb and delay now are controlled from MIDI rather than from the GUI. This switch is achieved with the ctlin object, which takes one argument in this example, the controller number of the control you want to use. The output is the raw value from the controller. Assuming you are using a UC-16 or similar controller, this is a value from 0 to 127. The other objects need to do a little math on this value to get it into the desired range. In the case of reverb, the range we want is from 0 to 1,000, so we divide by 127 to get a value from 0 to 1 and then multiply by 1,000 to get our final value. For decay, a value of 0 to 1 is good, so we need only to divide. Providing visual feedback on the values to which your effects are set is good practice, so this patch sends a copy of both reverb and decay to number boxes marked as such.
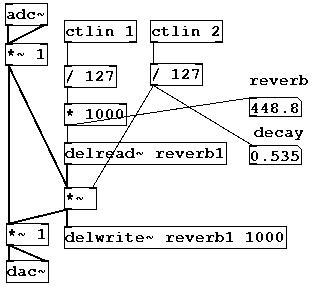
Figure 15. Using MIDI to Control a Patch
There you have it—a fully computerized, MIDI-controlled sound effect made from only a few Pd objects connected together. This is only the beginning of what's possible. Got a MIDI keyboard? You can use it as a control device and make a patch that actually synthesizes the notes. Or, make a patch control the MIDI keyboard. You even could make an entire reprogrammable effects box. Furthermore, you don't have to be content with the existing objects in Pd; you can write your own in C or even in Pd itself. With Linux and Pd, the only limits are your skills and the speed of your CPU.
All of the examples from this article are available from the Linux Journal FTP site at ftp.linuxjournal.com/pub/lj/listings/issue116/7062.tgz.