
With a little programming experience, you'll have everything you need to build applications for the Linux desktop when you're done reading this.
With a little programming experience, you'll have everything you need to build applications for the Linux desktop when you're done reading this.
by Jason Mott
There are many toolkits to choose from for building Linux desktop applications. Some say this is Linux's downfall; others say it is its greatest feature. I'll stand somewhere in the middle and say choice is good if you choose what meets your needs. Most graphical user interfaces (GUIs) on Linux are based on X, a client/server architecture that allows for networked computers to share GUI applications. With X, the application is the client that sends its graphical output to an X server. The X server accepts applications' output on behalf of its local hardware (or sometimes virtual hardware, but I won't go there in this article). In most cases, the X server and the X client are on the same machine, but use the client/server architecture nonetheless.
The base-level toolkit for building an X client is called Xlib. Xlib is much too low-level and difficult to use by itself to build an application from scratch. As a result, many toolkits have been built on top of Xlib to make it easier to write GUI applications for X. Subsequently, when writing GUI applications using one of the high-level toolkits, you never even know it's a networked application (that it's sending its graphical output to a server).
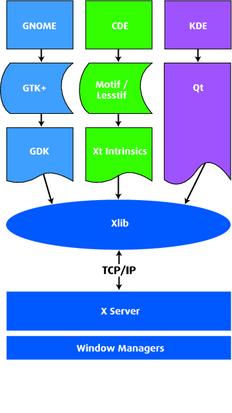
The two most popular open-source toolkits that layer on top of Xlib are Qt and GTK+, upon which KDE and GNOME are respectively built. Motif is another popular toolkit (not open source, but there is an open-source clone called Lesstif). Figure 1 shows a diagram of these (and more) and their relationship with one another. The farther down on the diagram, the lower the level of API it is. I prefer KDE/Qt for many reasons, but mostly because it's focused on a good user interface and a clean and well-designed API.

Figure 1. Relationships between KDE and GNOME and Various Toolkits
I actually built an application from scratch for this article (a calculator) to show how quick and easy it can be. To follow along you'll need some tools—most importantly, KDevelop. I used version 2.0.2 running on KDE 2.2.2. When using KDevelop's setup wizard you'll be told what dependencies you're missing. Visit the KDevelop web site (www.kdevelop.org) or check with your distribution's included software, and get KDevelop installed. If you have KDE as part of your distribution, then you'll have KDevelop.
Most tutorials on application development try to be IDE-agnostic. I've decided against this for a few reasons: KDevelop is free and comes with KDE; KDevelop makes an already easy API even easier, and KDevelop's wizards help the developer conform to KDE user-interface standards. For those who don't like to deal with Makefiles or creating configure files (or even dealing with the easier automake and autoconf), KDevelop will handle these things for you. And for geeks who do like to mess around with Makefiles, KDevelop allows you to tweak them. In fact, your KDevelop application is ready to be built with the traditional ./configure, make, make install. In other words, you're free to break free from KDevelop anytime you want.
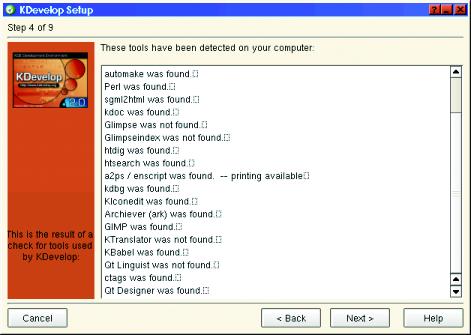
The first time you fire up KDevelop it will run you through a setup wizard. The most important piece of the wizard is when it checks for dependencies (Figure 2). Take the time to look through this output; if there are failures listed, do yourself a favor and try to find the libraries needed. The easiest way to do this is to use www.rpmfind.com (if your distribution is RPM-based). For each library that failed, do a search for it on the rpmfind web site. From the search results, select the RPM appropriate for your distribution and install it. Once you've done that, rerun the KDevelop wizard (type kdevelop --setup on the command line or find an entry in your K menu that says KDevelop Setup). If there are still missing items, repeat as necessary.

Figure 2. KDevelop Setup Wizard
The calculator I built is simple and only does basic arithmetic. The whole thing took about two hours to complete (okay, three hours, but I wasn't in a hurry). I was going to name it Kalculator, but there is an obscure application out there that already uses that name. So I chose Kalculate. I did not use nor view any code from KDE's stock calculator called KCalc, which has more mathematical features than mine. I've always felt KDE should have a basic calculator anyway, so I'd like to see user-friendly features added to Kalculate rather than more mathematical features. Therefore, when you're done reading this you can be a part of a living experiment in open-source development—come join the team and add a feature! You'll get special preference if you say this article sent you (sourceforge.net/projects/kalculate).
We are not going start with a new project, but rather with the power of the Internet; we're going to use Kalculate. To get the code for Kalculate from the official CVS server, type the following (assuming you have write permissions, create a directory called /usr/local/src if you don't already have one):
cd /usr/local/src
cvs -d:pserver:anonymous@cvs.kalculate.sourceforge.net:
/cvsroot/kalculate login
If this command asks for a password, press enter; no password is needed.
cvs -z3 -d:pserver:anonymous@cvs.kalculate.
sourceforge.net:/cvsroot/kalculate co kalculate
Of course, if you want to build this application yourself, you wouldn't grab the source. But because I'm not going to do a line-by-line rundown here, it's probably best to get the source and then use your new knowledge to either add features or build a new application.
The design pattern used here is called the Document-View model. It starts out with three application-specific classes: KalculateApp, KalculateDoc and KalculateView. These three classes would have been created for you if you were freshly starting this project with KDevelop. For Kalculate, I did not add any additional classes other than what is provided in the template. I did this on purpose so that it would be easy to demonstrate the design pattern and to show just how far along KDevelop starts you. All I had to do to build a fully functional calculator was to modify three classes, add a couple of icons and voilà!
The basic rundown of Document-View is that the business logic goes into the document end, and the user-interface stuff goes into the view end. In theory, there could be several views of the same document. In the generic sense, a “document” is one open session of a “thing”. Naturally, this is easiest to comprehend with something like a text editor. In that scenario, the document object would represent all the behaviors and properties of a text file, whereas the view object would provide the display and user interface of the text to the screen. You'll even notice in the skeleton code that saving, printing, opening and closing routines are stubbed out for you. Clearly the text editor metaphor is the basis for this model.
However, as is the case for Kalculate, this metaphor doesn't always work. A calculator doesn't really have a file it represents; it has a certain set of functionality it represents. So although the KalculateDoc class will provide our business logic, we have no need for the open, close, save and print functionality. For now, in the Kalculate code, I commented out the stock code (that KDevelop provides) that I didn't need instead of deleting it. This way, if the need arises, we still have the stub.
What we do need for a calculator, on the business logic side of things (KalculateDoc), is to be able enter numbers, assign actions for those numbers and get the resulting number (and of course, internally it actually needs to perform the actions). On the user-interface side, we need buttons for entering the numbers and entering actions, and we need a display of the numbers. Assuming you put the cvs checkout into /usr/local/src, you'll have a /usr/local/src/kalculate directory. Type the following:
cd /usr/local/src/kalculate
kdevelop  kalculate.kdevprj &
This will open up the project. KDevelop stores its project info into a file named after the project with a .kdevprj ending. Depending on how you have your preferences set up, you should see something like Figure 3. If you don't see a project tree on the left side, make sure that View-->Tree Tools Views-->Files is selected. You will see the project file structure click into the kalculate directory (yes, this is a kalculate directory under a kalculate directory, don't clear your eyes). Here are all the source files. Of particular interest now are the kalculatedoc.cpp and kalculatedoc.h files. Double click them. These two files are the core of our calculator—the KalculateDoc class handles all of the processing. It's a virtual machine that needs someone to hook up controls to it. If you view kalculatedoc.h, you'll notice something very odd about the class declaration—there's some seemingly incorrect syntax. This brings us to the world of slots and signals.
In event-driven applications, such as desktop applications, a subsystem needs to be built that allows components to be notified when an event occurs. An event could be some type of user interaction (moving the mouse pointer, pressing the mouse button, pressing a key, etc.). Events also may be other software components announcing some condition (e.g., the time, a full filesystem, etc.). A popular event in GUI applications, and especially Kalculate, is that a button widget has been pressed. In KDE land, events are called signals, and the things that handle the events are called slots. As the developer, you can create signals and slots, and you can control which slots are connected to which signals. You can also connect your slots to stock signals (and vice versa) or connect stock signals to stock slots. By stock I mean using a KDE or Qt library class that already has slots and/or signals defined.
KDE (and thus Qt) gets away with the incorrect syntax because it uses the standard C++ preprocessor #defines that replace signals: with protected: and slots and emit with nothing. The extra syntax is needed by moc (which is run before the preprocessor). The Meta Object Compiler (moc) is a program that comes with the Qt library and is run on your QObject header files in order to create extra methods for your classes that make them usable as a QObject subclass. All objects that use slots and signals must be a subclass of QObject, and the class definition must have the Q_OBJECT macro called (as you can see in the kalculatedoc.h file). The QObject superclass has a connect method, and that is the method you use to connect your slots and signals.
To create signals, declare them under signals: in your class declaration. For signals, you don't really have to create a subsequent method. All you have to do is call emit on the signal name, and any slot that is connected to it will be called; moc actually creates the signal method for you.
Slots, on the other hand, do have to be created. You declare your slots under public slots, or protected slots, and then define them as normal methods in your .cpp file. You can then connect them anytime you want. Like this:
connect(this, SIGNAL( mySignal() ),
        this, SLOT( mySlot() ) );
Assuming you have defined a signal called mySignal() and a slot called mySlot() within the same class, the above call to connect would bind them together so that any time emit mySignal() is called, mySlot() will get called. If you wanted to connect your slot to some other signal in some other object, then your first argument would be the instance of the object, and your second argument would be the SIGNAL() macro with the name of the signal inside the parentheses. It's that easy. All the hard stuff (including running moc on your headers) is done by KDevelop.
So (back to our calculator) the KalculateDoc class is a series of slots. Each slot represents an action one would take on a calculating machine. The header file declares all the slots as shown in Listing 1. Again, the only thing that makes these methods special is that they are under a “public slots:” label, and thus moc will create some metadata about them. As slots, you still need to define the methods as normal (look at kalculatedoc.cpp to see my definitions of these slots). Signals, on the other hand, you do not define; moc does that for you.
So now all we need is a GUI that uses this class. Enter KalculateView (I hope you are actually opening up the source code and checking it out). The kalculateview.h file defines our class that provides the GUI. Under “protected” you'll see that several layout managers, an LCD display and several buttons are declared. I did add one file to KDevelop's stock template code; it's called kalculatesizes.h, and here is what is in it:
#ifndef KALCULATE_SIZES_H
#define KALCULATE_SIZES_H
#define BUTTON_WIDTH 35
#define BUTTON_HEIGHT 35
#define LAYOUT_SPACING 4
#define MAX_WIDTH (BUTTON_WIDTH * 5)
        + ((LAYOUT_SPACING *2) * 4)
#define MAX_HEIGHT (BUTTON_HEIGHT * 5)
        + ((LAYOUT_SPACING *2) * 4)
#endif // SIZES_H
Basically, it sets up the size of our calculator. I decided to go with a calculator that isn't resizable, but I wanted to make it easy to change the button sizes. So I define the sizes in this file. All one needs to do is edit this file and recompile to get a calculator with different-sized buttons (perhaps future versions could allow for this on the fly, but I'm hesitant for some reason).
In KalculateView, constructor (in kalculateview.cpp) is where this application comes to life. The call to setMaximumSize() is what makes this not resizable. The size policy helps out too, but is just a suggestion. I'll take a moment here and explain layout managers. Basically, every GUI widget has methods to set its geometry (height, width, relative position, etc.). When an application is first set up, and when it's subsequently resized, it wouldn't be very fun if you had to write code that resized or repositioned it. And on the initial setup, without a layout manager, all the buttons in this application would have to be positioned with hard-coded x/y coordinates. That could take hours of time when you wanted to change the size of the calculator. So, instead of hard-coding geometry attributes, we register our widgets with layout managers that follow certain rules, for example, the QVBoxLayout, which adds widgets in a vertical column. Every time you put a widget in with the addWidget() method like this:
outerLayout->addWidget(output,1);
it adds the widget just below the previous widget. A QHBoxLayout would add the widget just to the right of the previous one. The second argument is what is called the stretch factor. Basically, the stretch factor decides how much space this widget is going to take in relation to the other widgets added to this layout manager. So if they are all 1, then they will all be the same size (unless factors like setMaximumSize override it). It takes the sum of all the stretch factors and applies a ratio. So if you had two widgets, the first with the stretch factor of 1 and the second with a stretch factor of 2, then the second would be twice as big as the first.
The really cool thing (as exemplified in KalculateView) is that you can add layout managers to layout managers. This allows you to create very complex layouts. Go ahead and play around with the Kalculate code; see what you can create.
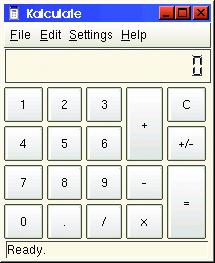
So, to run this application, do the following. Select Autoconf and Automake from the Build menu. Then select Configure from the Build menu. When this asks for arguments, type --prefix=[your base kde dir]. This will allow you to install the application, which is needed if you want the application's icon to show up. On my machine, which is Mandrake, the base directory for KDE is /usr. Your distro may differ. Then, select Execute from the Build menu, and it will compile and run. You should see something like Figure 4. But the icon in the upper left-hand corner may be missing until you install it. To install, as root type:
cd /usr/local/src/kalculate
make install
<center>

Figure 4. Kalculate
I hope I have pointed you in the right direction. I have barely scratched the surface of all the things you can do with KDE, but I have shown you how quickly KDevelop allows you to get started. It handles almost all the back-end work for you and gives you an application that compiles on the command line without the presence of KDevelop (this is good for distributing your code). Feel free to e-mail me if you have any questions, and I encourage you to join the Kalculate team and add some features.