
Last month we installed Debian Linux 2.2.r2 (aka potato) and configured LILO to boot Linux, Win2K, WinNT, Win98SE and Win98. Building a Linux desktop machine is a two-step process. The second part, installing XFree86 for a graphical desktop, is our first task this month. Once we have the X Windows System working properly we will patch kernel 2.2.17 to install Video4Linux and use XawTV to watch cable television on our X desktop. As a newbie to Linux I will encounter many obstacles doing all this.
By default Linux boots in console mode. Like the old Windows 3.1, a Linux box first boots as a text console then loads the GUI. If you are building a Linux server, the console may be all you need or want. A GUI can create a lot of unnecessary overhead and more can go wrong. However, we are building a desktop. We will install the X Windows System, the Blackbox window manager, Netscape and other graphical applications such as The GIMP.
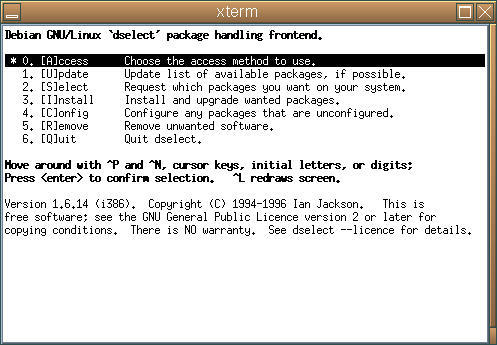
The Debian package management tool is called dselect. This software will install applications included in our six Debian CDs and can also retrieve packages across the Internet. There are about 4,000 packages to choose from on the Debian CDs. Linux applications don't come enclosed in a nice graphical install program the way Windows programs typically do.

deselect
The console-based dselect interface was slick in its day but is showing obvious age. It isn't very acceptable by modern interface standards, and with so many packages it is difficult to navigate. You may be offered the option to make dselect operate via a web browser. Don't do it! We couldn't figure out how to make this work (we didn't try very hard) but had plenty of trouble turning it off so we could go back to the console interface.
XFree86 (www.xfree86.org) is an open-source windowing system that runs on Linux and other operating systems. It isn't the only X Windows System server available, but it is popular and free. X is different from Windows. The client/server architecture of X enables users to open a windows session to a remote host. We won't notice that running the client and server on the same machine. XFree86 was recently rewritten for much better screen performance, but we will be installing the older version 3.3.6-11 that comes with Debian Potato. We will save installing version 4.x for a later time. It will prove difficult enough installing the supported 3.x version.
Install XFree86 by selecting it in dselect. Installing XFree86 only unpacks the software. It doesn't configure it. There are several programs available for configuring XFree86. One often suggested is XF86Setup, a program that configures X from within a graphical X application. The obvious question to ask is: how does this work if you don't have X configured in the first place? The answer is: better than you would expect but not good enough. Life is hard enough without trying to navigate a GUI without a working mouse. The other major configuration program is a dated console application called xf86config. If dselect seems primitive then xfx86config must be prehistoric. You can't even back up if you make a mistake. Still, it does the job. Keep starting over until you get it right.
Our Hercules Terminator 128 2x/I AGP card is listed as one of the many cards you can select in xf86config (the 2x/I is #370 in the database). We were warned by xf86config not to probe clocks or use any Clocks line with this card, otherwise we could seriously break something or fry our monitor. You can let the program probe try to figure out the card by itself. Along the same lines, you must know the correct specs for your monitor. Our ViewSonic E790 monitor supports a vertical frequency of 50-200KHz and a horizontal frequency of 30-95KHz. We found that out easily enough on their web page.
Why our mouse wouldn't work was a mystery at first. Luckily we noticed that gpm, the general purpose mouse or console mouse driver, was one of the packages installed. This will eat mouse events before X can get them. It is possible to configure X to daisy chain with gpm. Not being clear why we want gpm anyway, we simply uninstall it.
Another package we wish we hadn't installed is xdm. We installed it without knowing what it was when dselect recommended it with a lot of other X stuff we were installing. What xdm does is automatically launch X when the computer boots, taking you out of console mode immediately and making you log in from X. If you have ever used UNIX in a computer lab you know what this login screen looks like. It is, of course, a disaster if X won't run because you don't have it configured yet! We managed to get into a console prompt and put exit 0 in /etc/init.d/xdm to stop it on boot.
If you aren't using xdm then you call startx to launch X. As X is loading, some console messages flash by before the display flips into graphics mode. If you are having trouble, as we were, you should specify startx >& x.log to redirect those messages to a text file you can study later. Pressing Ctrl+Alt+Backspace quits the X server to return to console mode.
Launching X, it comes up in 16-color 640 x 480 mode, definitely not what we asked for. Using Ctrl+Alt+keypad+ is supposed to cycle through the different supported screen resolutions but has no effect. It isn't until we examine our saved x.log file that we realize that we are running the generic X server and not XF86_SVGA as we had specified in xf86config. Nothing warned us that XF86_SVGA wasn't even installed! We check to find that the symbolic link at /etc/X11/Xserver doesn't point to it. Another quick session with dselect sets it right. XF86_SVGA installs separately from the rest of X. We would have caught that if dselect was more user-friendly.
Once we get XFree86 working we need to adjust the frequency settings to center the image properly on our monitor. The xvidtune program handles that pretty nicely. You interactively adjust the screen until it matches the appearance you want. However, you can't automatically save that setting as in Windows. You must paste the setting's output by xvidtune into your XF86Config file. Once you get it close using xf86config you will edit the XF86Config file by hand many times making minor adjustments.
A window manager is responsible for the “decoration” or look and feel of window frames in X. Many different window managers are available. Note, we are not talking about desktop managers here, such as GNOME or KDE. They also include a window manager, but desktop managers have a lot of other features such as icons on the desktop, a trash can and a suite of interoperable applications. They also tend to consume a lot of RAM and be slow. We'll give GNOME a try sometime, but for now we're sticking to just a simple window manager.
The default window manager for Debian is Window Maker. It seems okay, but we have a problem with it. Perhaps our problem has a simple solution, but we can't figure it out. How do you take a screen shot? Without that feature it will be pretty hard to write this article!
Blackbox (http://blackbox.alug.org/) is a window manager known for being lightweight and sexy. It supports themes to allow you to drastically change its look and feel. And, it just seems cool. Using dselect, we install it without difficulty. Window Maker still comes up as our default window manager, but when we right click a menu option has been added to switch to Blackbox. Window Maker was no slouch, but navigating the same menus in Blackbox is extremely crisp and quick.
To create our screen snapshots we are using The GIMP. We could use xwpick, xgrab, xv or xdmp, but The GIMP is an application we wanted to install anyway. It is recognized as one of the best applications available for Linux. The GIMP is very similar to Photoshop, a popular graphics editing program. To take a screen shot choose from the menus “File” “Acquire” “Screen Shot”. Doing that works fine in Blackbox, but for some reason fails in Window Maker. The GIMP is open source and available for other operating systems. We use it on WindowsNT, too.
Amaya is an open-source web browser and editor. We've had pretty good luck with it in Windows, but when we install the Linux version, it simply crashes. We're not so interested in Amaya at this point that we feel like tracking down the trouble. Netscape, for license reasons, is not included on the Debian CDs. It must be downloaded from the Netscape site. Although a Solaris version of Internet Explorer is available, Microsoft doesn't offer a Linux version.
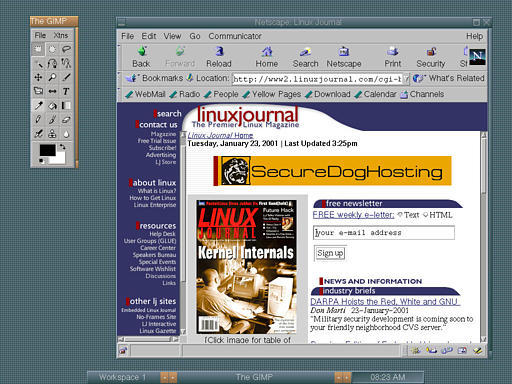
We download Netscape for Linux version 4.76 (netscape-smotif-476), the last of the 4.x versions. Netscape 6 is notorious as a resource hog so we avoid it. Version 5 never was. Since we don't have a working web browser in Linux (unless you count the console-mode Lynx browser) we download Netscape by booting Windows and surfing for it using IE. We save the file to our FAT16 Windows partition, then reboot to Linux. In Linux we mount the Windows partition so we can access our download using mount -t vfat /dev/hdb1 /win98.

Netscape Screenshot
There is a method to get dselect to install Netscape after you download it, but it seems easier to ignore that and do the standard Netscape install. All nonpackaged installs follow the same general procedure of changing to the generic install directory and uncompressing the tar file using the xvfz options:
cd /usr/local/install
tar xvfz filename.gz
We then execute the ns-install script to install Netscape. All is not well, however, because we get an error message when we try to launch Netscape. It can't load the libstdc shared library. We are using a different version of that library than Netscape expects to find. We trick it by finding the library we do have and creating a link to give it the same name as the missing (obsolete) library:
find / -name "libstdc*" -print
ln libstdc++-3-libc6.1-2-2.10.0.so libstdc++-libc6.1-1.so.2
All that remains is to point Netscape to our proxy server using “Preferences” “Proxy” “Manual”. We now have a working graphical web browser.
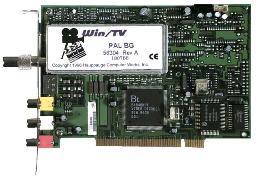
The Hauppauge (http://www.hauppauge.com/) WinTV PCI card provides television video in a window. With a price of about $70 US it has a reputation as one of the best cheap PC TV video cards around. It works in conjunction with your existing video card, but not every card is supported. If you are a channel surfer like me, you may discover you prefer casual TV viewing on your PC. It's convenient, and you can click through the channels much faster. WinTV works with many operating systems including Linux, Windows, FreeBSD and BeOS.

Hauppauge WinTV
There is a lot of conflicting information on the Web about installation of Video4Linux (V4L) and the bttv driver used with WinTV and other cards based on the BT848 chip. There are so many different driver versions available; that can be confusing. The version of V4L included with Debian Potato is obsolete, so we won't use that.
The current version of V4L requires the i2c bus driver available in the 2.3 kernel. Use uname -a to check what kernel version you have. Since our kernel is 2.2.17 we must patch it. We don't understand this right away but know something is wrong because we see a bunch of kcompat.h compile errors attempting to build V4L from source.
Before we can build the kernel we must first install the kernel source using dselect and create a symbolic link:
cd usr/src/
ln -s kernel-source-2.2.17 linux
cd linux
We then do make mrproper to delete any old kernel compile settings we might have. We use make menuconfig to launch the kernel configuration program. This is a very nice console app. If only xf86config and dselect looked this good! In menuconfig we install kmod (the new module loader) and Video4Linux. Everything we can make as a module (NTFS, VFAT and SMB, but not ext2) we do. There are a lot of options. It takes several tries before we drill through every menu choice and pick the appropriate settings.

menuconfig
Before compiling our kernel we need to install the new i2c driver from source as instructed in the bttv FAQ at www.struse1007.de/bttv/faq.html. The i2c driver supports the internal serial bus protocol used by the BT848 to tune stations and so forth:
cd /usr/local/install
tar xvgz i2c-2.5.4.tar.gz
cd i2c-2.5.4
vi QUICKSTART
To build the i2c driver we replace the i2c* files in the kernel sources with our downloaded driver source then build the driver:
makeNow it is back to the kernel to build in the new kernel and drivers. We first back up our modules directory. We will build and install all new modules to go with our new kernel:
cd /lib/modules
cp -r 2.2.17 2.2.17.bak
cd /usr/src/linux
make dep
make bzImage
make modules
make modules_install
Back up the old kernel. Edit lilo.conf to be able to boot your old kernel in case something goes wrong. Install the new kernel. Be sure to remember to run LILO before shutting down or you won't be able to boot.
mv vmlinuz vmlinuz.old
vi lilo.conf
vi /boot/bootmess.txt
cp -i /usr/src/linux/arch/i386/boot/bzImage
cp -i bzImage /boot/vmlinuz-2.2.17v4l
ln -s /boot/vmlinuz-2.2.17v4l vmlinuz
lilo
Go back to i2c-.5.4 and install our 2.3 driver. We ignore dependency warnings because the old kernel is still running.
make install
depmod -a
Install the bttv driver:
tar xvfz bttv-0.7.51.tar.gz
make
make install
depmod -a
Shut down using Ctrl+Alt+Delete and reboot. It boots! We are running our new kernel! A peek at /var/log/messages indicates that bttv is operating okay.

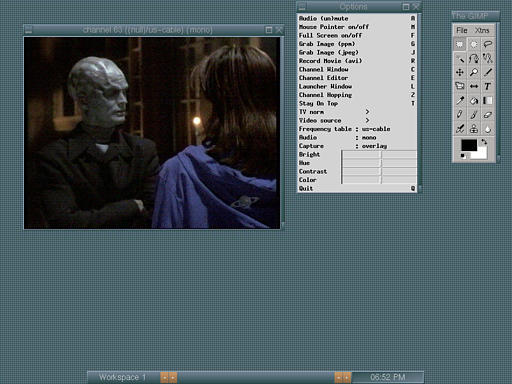
XawTV
Because we installed the current version of V4L we also install the current version of the XawTV viewer program. It won't start because it can't find its X resources. The docs aren't much help. On a hunch we install the old versions of XawTV and fbtv from the Debian CDs, then overwrite it with the new version of XawTV:
tar xvfz xaw.3.26.tar.gz
make
make install
That works! We right click to get the settings menu, make some adjustments, then use the arrow keys to tune channels. We can now view television on our X desktop.
To recap, the sequence we followed was to install XFree86, configure it, install The GIMP and Netscape, install the updated i2c driver from source, patch the kernel and install Video4Linux and XawTV. Next month we will take a close look at Linux MPEG movie players. We will also install BeOS under LILO and compare using our WinTV card in Linux with BeOS and Windows.